Basic (Programming in intra-mart Accel Platform for the first time)
In this paragraph, we will go through the flow of the script development on intra-mart Accel Platform by creating Hello World using script development on intra-mart e Builder for Accel Platform which is considered as the introduction of the development in intra-mart Accel Platform.
Flow of tutorial
Prerequisite
intra-mart e Builder for Accel Platform should be installed.
intra-mart Accel Platform should be installed and default setting should be complete.
Create the environment including the script development framework in the base module.Create the Resin server of development environment for unit test.
Let us create Hello World on intra-mart e Builder for Accel Platform
Hello World is created using the following procedure.
Step 1: Project Creation and Setting
Carry out the project setting by creating the module/project on intra-mart e Builder for Accel Platform.Refer to “Project setting” and “Module/Project creation” of “intra-mart e Builder for Accel Platform User Operations Guide” for the techniques of project creation/setting.
Step 2: Input Screen Creation
Create input screen (input.html).Create folder in helloworld/js/ level under src/main/jssp/src/ of project. Create “input.html” file under the created folder and implement as given below.<!-- HEAD Tag --> <imart type="head"> <title>Hello, World</title> <script type="text/javascript"> $(function() { $('#button').click(function() { $('#hello_info').submit(); }); }); </script> </imart> <!-- Title displayed on screen --> <div class="imui-title"> <h1>Hello, World (Script Development)</h1> </div> <!-- Input Screen --> <div class="imui-form-container-narrow"> <p> <label>Please input the name. </label> </p> <!-- Input the path of output result in setting action of Form --> <form action="helloworld/output" name=form id="hello_info" method="post"> <div> <!-- Text box setting --> <imart type="imuiTextbox" id="name" name="name" size="10" ></imart> </div> <!-- submit button setting --> <imart type ="imuiButton" value="Hello!!" name="button" class="mt-10" id="button" inputType="submit"></imart> </form> </div>Warning
Save it with the character encoding as UTF-8.
Step 3: Output Screen Creation
Create output screen (output.html).Create with name “output.html” under src/main/jssp/src/helloworld/js/ of project and implement as given below.<!-- HEAD Tag --> <imart type="head"> <title>Hello, World</title> <script type="text/javascript"> function back() { $('#back-form').submit(); }; </script> </imart> <!-- Title displayed on the screen --> <div class="imui-title"> <h1>Hello, World (Script Development)</h1> </div> <!-- Toolbar (Place the button to return to the previous screen) --> <div class="imui-toolbar-wrap"> <div class="imui-toolbar-inner"> <ul class="imui-list-toolbar"> <li> <!-- Create the icon of "Return" button and call the JavaScript function --> <a href="javascript:back();" class="imui-toolbar-icon" title="back"> <span class="im-ui-icon-common-16-back"></span> </a> </li> </ul> </div> </div> <!-- Output Result --> <div class="imui-form-container-narrow"> <label> <imart type="imuiTextbox" id="result" name="result" value=name class="imui-text-readonly" readonly /> </label> </div> <!-- Set the input screen path in form inforamtion action of "Return" button.--> <form id="back-form" name="backForm" action="helloworld/input" method="POST"></form>Note
In the tag described in the HTML file which is operated on the intra-mart Accel Platform, use the <imart type=”head”> for <HEAD> without describing the <HTML>, <BODY>.Refer to UI (Design Guidelines) for the details.Warning
Save it with character encoding as UTF-8.
Step 4: Input Screen Process Creation
Implement the JS file (input.js) that executes the initialization process of input screen.Create with name “input.js” under src/main/jssp/src/helloworld/js/ of project and implement as given below./** * Unprocessed since no particular process is carried out In Hello World * The process requiring initialization is described in init(). */ function init(request) { }Warning
Save it with the character encoding as UTF-8.
Step 5: Output Screen Process Creation
Implement the JS file (output.js) that executes the result display process for input information.Create with name “output.js” under src/main/jssp/src/helloworld/js/ of project and implement as given below./** * Bind variable of output result */ var name; /** * Initial Display * Pass the name */ function init(request) { name = 'Hello, ' + request['name']; // Create output result and store in bind variable }Warning
Save it with the character encoding as UTF-8.
Step 6: Routing Configuration File Creation
Create xml (helloworld.xml) for routing.Create “helloworld.xml” file under src/main/conf/routing-jssp-config/ of project and describe the mapping information of file as follows.Set “welcome-all” in the mapper attribute of authz-default which is equivalent to the approval settings.In the file-mapping equivalent to the setting of URL, set the URL of 2 screens in path attribute and file path of 2 screens in page attribute respectively.<?xml version="1.0" encoding="UTF-8"?> <routing-jssp-config xmlns="http://www.intra-mart.jp/router/routing-jssp-config" xmlns:xsi="http://www.w3.org/2001/XMLSchema-instance" xsi:schemaLocation="http://www.intra-mart.jp/router/routing-jssp-config routing-jssp-config.xsd "> <authz-default mapper="welcome-all" /> <file-mapping path="/helloworld/input" page="/helloworld/js/input" /> <file-mapping path="/helloworld/output" page="/helloworld/js/output" /> </routing-jssp-config>Note
Refer to Routing for the details of routing setting.Warning
Save it with the character encoding as UTF-8.Here, creation of the sample of script development is complete.The source created so far is appropriately deployed in the folder on Resin server according to the project settings.To migrate to production environment apply the created project by user definition modularization or deploying the source.
Registration and screen display
Step 1: Menu Registration
Here, practically execute the above mentioned created sample by registering it in the site map.Start Resin and login to the Accel Platform as tenant administrator.URL of the login screen is http://<HOST>:<PORT>/<CONTEXT_PATH>/login.After that, maintenance screen of menu is displayed and set the menu as follows.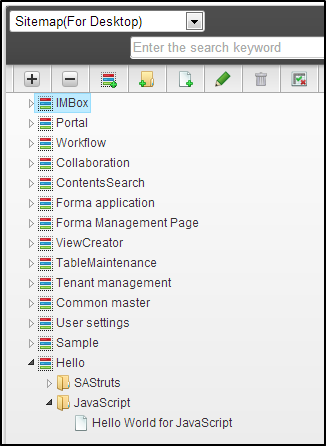 Enter the following information in the information of the new item created here.
Menu Item name (Japanese) Hello World for JavaScript URL helloworld/input Moreover, in order to browse the menu, set the authentication as follows in the created “Hello” group.In this paragraph, perform the settings such that the reference of the guest user and authorized user for Hello group can be approved.Refer to Authorization for the details.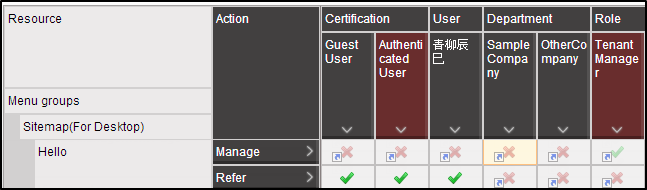
Step 2: Operation of Hello World
Reflect the set menu and execute it.It is possible to select from sitemap as shown in the following image.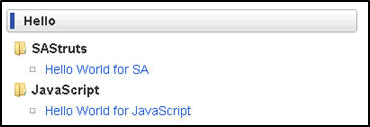 Input screen is displayed after clicking the menu item registered earlier on site map.
 When name is entered in the text box, it is displayed on the result screen.
 Returns to the input screen when “Back” icon on the top of the result screen is clicked.
Note
Following points are confirmed in this tutorial.