基础( 首次使用 intra-mart Accel Platform 进行编程)
在本项中,作为在 intra-mart Accel Platform 下进行开发的初步介绍,通过在intra-mart e Builder for Accel Platform上创建使用SAStruts框架的Hello World程序,体验一下在 intra-mart Accel Platform 上进行SAStruts框架开发的流程。
教程
前提条件
已安装 intra-mart e Builder for Accel Platform 。
已安装 intra-mart Accel Platform ,并已完成初始设置。
请创建在基础模块中包含 SAStruts 开发框架的环境。请按照单元测试要求创建执行环境。
我们开始用 intra-mart e Builder for Accel Platform 创建 Hello World 吧。
按照以下步骤创建 Hello World 。
步骤1:项目的创建和设置
在intra-mart e Builder for Accel Platform上创建模块项目,进行项目设置。关于项目的创建和设置方法,请参阅《intra-mart e Builder for Accel Platform 用户操作指南》的《模块项目创建》,及《项目设置》。
步骤2:convention.dicon的修改
在convention.dicon中设置root package。在SAStruts 框架中,在包名的开头指定root package,创建 action 等包并保存必要的文件,然后指定URL。举例来说,创建Action类时,包名与 URL 如下所述。ex: Action 类名:设置为root package.action.foo.BarAction时,URL为:http://主机名/war名/foo/bar/。把<% war_home %>/WEB-INF/classes/convention.dicon 配置在 src/main/resource 目录下,确定root package,然后如下编写 convention.dicon。另外,在下述示例中,将 root package 设置为”sample.sastruts”。<?xml version="1.0" encoding="UTF-8"?> <!DOCTYPE components PUBLIC "-//SEASAR//DTD S2Container 2.4//EN" "http://www.seasar.org/dtd/components24.dtd"> <components> <component class="jp.co.intra_mart.framework.extension.seasar.convention.IMNamingConventionImpl"> <initMethod name="addRootPackageName"> <arg>"org.seasar.framework.container.warmdeploy"</arg> </initMethod> <initMethod name="addRootPackageName"> <arg>"tutorial"</arg> </initMethod> <initMethod name="addRootPackageName"> <arg>"sample.sastruts"</arg> </initMethod> </component> <component class="org.seasar.framework.convention.impl.PersistenceConventionImpl"/> </components>注解
关于进行 convention.dicon等各种设置的dicon文件的式样,请参阅seasar2主页。
步骤3:输入页面的创建
创建输入页面( index.jsp )。在项目的 src/main/webapp 下,按层次创建 /WEB-INF/view/sample/sa/hello 文件夹,在所创建文件夹下创建“index.jsp”文件,编写如下源代码。<%@page pageEncoding="UTF-8"%> <%@ taglib prefix="imui" uri="http://www.intra-mart.co.jp/taglib/imui"%> <%@ taglib prefix="s" uri="http://sastruts.seasar.org" %> <%@ taglib prefix="f" uri="http://sastruts.seasar.org/functions" %> <!-- HEAD标签 --> <imui:head> <title>Hello, World</title> <script type="text/javascript"> $(function() { $('#button').click(function() { $('#helloForm').submit(); }); }); </script> </imui:head> <!-- 页面上显示的标题 --> <div class="imui-title"> <h1>Hello, World (SAStruts)</h1> </div> <!-- 输入页面 --> <div class="imui-form-container-narrow"> <p> <label for="name">Please input the name. </label> </p> <!-- 输入表单的设定 向action中输入跳转到结果显示画面的路径(调用Hello动作的output方法) --> <s:form action="/sample/hello/output/" styleId="helloForm"> <div> <!-- 文本框 --> <imui:textbox type="text" value='' id="name" name="name" size="10" /> </div> <!-- 提交按钮 --> <imui:button name="button" value="Hello!!" class="mt-10" id="button"></imui:button> </s:form> </div>警告
请将字符代码置为 UTF-8 并保存。
步骤4:输出页面的创建
创建输出页面( output.jsp )。在项目的 src/main/webapp/WEB-INF/view/sample/sa/hello 目录下创建“output.jsp”文件,编写如下源代码。<%@ page contentType="text/html; charset=UTF-8" pageEncoding="UTF-8" %> <%@ taglib prefix="imui" uri="http://www.intra-mart.co.jp/taglib/imui"%> <%@ taglib prefix="s" uri="http://sastruts.seasar.org" %> <%@ taglib prefix="f" uri="http://sastruts.seasar.org/functions" %> <!-- HEAD标签 --> <imui:head> <title>Hello, World </title> <script type="text/javascript"> function back() { $('#back-form').submit(); }; </script> </imui:head> <!-- 页面显示的标题 --> <div class="imui-title"> <h1>Hello, World (SAStruts)</h1> </div> <!-- 工具栏(配置返回到前一页面的按钮) --> <div class="imui-toolbar-wrap"> <div class="imui-toolbar-inner"> <ul class="imui-list-toolbar"> <li> <!-- 调用“返回”按钮的图标、HelloAction的index方法 --> <a href=${f:url("/sample/hello")} class="imui-toolbar-icon" title="back"> <span class="im-ui-icon-common-16-back"></span> </a> </li> </ul> </div> </div> <!-- 输出结果 --> <div class="imui-form-container-narrow"> <label> <imui:textbox type="text" value="${f:h(helloDto.outputString)}" id="name" name="name" size="10" class="imui-text-readonly" readonly /> </label> </div>注解
在intra-mart Accel Platform上运行的HTML文件中编写的标签中,请不要记述<HTML>、<BODY>,<HEAD>请使用<imui:head>。关于详细内容,请参阅:doc:../application/im_ui/index。警告
请将字符代码置为 UTF-8 并保存。
步骤5:Form类的创建
警告
请将字符代码置为 UTF-8 并保存。
步骤6:Dto类的创建
创建保存输入信息的Dto类。在此,将包名置为 sample.sastruts.dto.sample,将类名置为 HelloWorldDto。HelloWorldDto 中编写的源代码如下所示。package sample.sastruts.dto.sample; /** * 传递到结果显示页面的DTO类 * @author intra-mart */ public class HelloDto { public String outputString; // 保存结果的字符串 }警告
请将字符代码置为 UTF-8 并保存。
步骤7:Action类的创建
创建对输入页面及输出页面进行处理的 Action 类。在此,将包名置为 sample.sastruts.action.sample,将类名置为 HelloAction。HelloAction 中编写的源代码如下所示。package sample.sastruts.action.sample; import javax.annotation.Resource; import javax.servlet.http.HttpServletRequest; import org.seasar.struts.annotation.ActionForm; import org.seasar.struts.annotation.Execute; import sample.sastruts.dto.sample.HelloDto; import sample.sastruts.form.sample.HelloForm; /** * 进行Hello World处理的Action类 * @author oka */ public class HelloAction { @Resource @ActionForm public HelloForm helloForm; // 保存输入信息的Form类 @Resource public HelloDto helloDto; // 保持输出信息的DTO类(需要设置为public) /** * 返回输入页面的路径 * @return 输入页面的路径 */ @Execute(validator = false) public String index() { return "/sample/sa/hello/index.jsp"; } /** * 返回结果显示页面的路径。 * @return 结果显示页面的路径 */ @Execute(validator = false) public String output() { helloDto.outputString = "Hello, " + helloForm.name; // 保存结果信息 return "/sample/sa/hello/output.jsp"; } }警告
请将字符代码置为 UTF-8 并保存。到此为止 Hello World 的创建完成。上面创建的代码根据项目设置,被部署在 Resin 服务器的文件夹中。要转到正式环境下时,请对已创建的项目进行用户定义模块化,或部署源代码后进行应用。
登记及页面显示
步骤1:菜单的登记
在此,我们把如上创建好的示例登记到网站地图上实际执行一下。启动 Resin ,以Tenant管理员身份登录 Accel Platform 。登录页面的 URL 为“ http://<HOST>:<PORT>/<CONTEXT_PATH>/login ”。然后显示菜单的维护页面,对菜单进行以下设置 在所创建的新项目中输入以下信息。
Menu-Name Hello World for SA URL sample/hello 为了使创建的“Hello”组别能浏览菜单,进行以下认可设置。本项将设置允许Guest用户及认证用户对Hello组别进行参照。关于详细内容,请参阅:doc:../application/authz/index。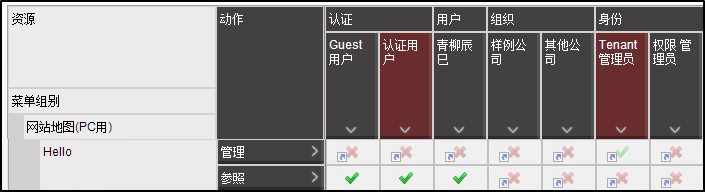
步骤2:Hello World的运行
显示已设置的菜单并执行。如下图所示,可以通过网站地图进行选择。 在网站地图中点击先前登记的菜单项目后,显示输入页面。
 在文本框中输入名字后,显示结果页面。
 点击结果页面上的“返回”图标后,返回输入页面。
注解
通过此教程中掌握了以下要点。