Appendix
Topics
- Creating aar File
- About Apache Axis2 Administration Console
- About services.xml
- Deploying Web Service
- How to apply Axis2 Module [im_ws_auth]
- About WSDL in Distributed Environment
- Adding the Authentication Module
- SOAP Message Monitoring
- About Web Service that does not require Authentication/Authorization
Creating aar File
A tool to create aar file (Axis2 Archive file) is introduced.Here, Ant task [aarGenerate] is used. This Ant task creates services.xml and aar file including services.xml.Please refer to [Apache Axis2 Web Administrator’s Guide Step 3: Create Archive File] of Axis2 project for aar file structure.It is assumed that this procedure is performed in the environment that meets the following conditions :
- Apache Ant is installed.
- [Tool for Web Service] exists.
Directory to which the tool for Web service is expanded will be denoted as %WEBSERVICE_TOOL_HOME% hereafter.Note
If build tool [Ant] has not been already installed, please install it by looking at the sites below :Ja-Jakarta Project Ant Installation (Japanese)Warning
jar or class cannot be included in aar file in this tool. In order to execute Web Service of aar file, implementation class of Web Service should be placed on a class path of application server.Specifically, please place jar file under %CONTEXT_PATH%/WEB-INF/lib and class under %CONTEXT_PATH%/WEB-INF/classes.
Various setting for Web Service to be published would be performed.
Edit AarGen.properties.
Edit %WEBSERVICE_TOOL_HOME%/AarGen.properties.Descriptions of each property is as shown below.
Property Name
Required
Description
serviceName
O
Specify the name to be published as Web Service. This value will become the aar file name.
className
O
Specify the implementation class of Web Service. Class should be specified with a full qualified name.
destDir
O
Specify the directory that outputs aar file.
moduleRef
X
wsdlDir
X
serviceAuthzUri
X
opeAuthzUriFile
X
verbose
X
Warning
If you are to specify the path in Windows environment, the delimiter character should be / or \.
Edit opeAuthzUriFile.csv.
Specify the authorization resource for Web Service Operation provided by Web Service by URI.Edit %WEBSERVICE_TOOL_HOME%/opeAuthzUri.csv. (Edit file with the value specified in opeAuthzUriFile of AarGen.properties.)If you do not specify the authorization resource for Web Service Operation, you do not need to edit this file.This file should be stated in CSV format. Field delimiter character is , (comma) and record delimiter character is a new line.In the examples below,
- URI service://sample/web_service/member_info/add for Web Service Operation add
- URI service://sample/web_service/member_info/find for Web Service Operation find
- URI service://sample/web_service/member_info/findAll for Web Service Operation findAll
would result.add,service://sample/web_service/member_info/add find,service://sample/web_service/member_info/find findAll,service://sample/web_service/member_info/findAllNote
If authorization resources are specified for both the service and Web Service Operation, the authorization resource specified in Web Service Operation is given priority over the other.Please refer to [Specifying Authorization Resource for services.xml] for details.Warning
If the authorization resource is specified, following error occurs at Web Service Operation execution time when corresponding authorization resource does not exist at the specified URI.[E.IWP.AUTHZ.DECISION.10007] Resource group is not registered.Please create the authorization resource in advance when you execute Web Service Operation.Please refer to [Adding Resources] of [Setting Authorization in Tenant Administrator Operations Guide] for how to add the authorization resource.Specify the environment information to execute AarGen.
Specify the directory to which Apache Ant is installed.Edit %WEBSERVICE_TOOL_HOME%/AarGen.bat (AarGeb.sh for Unix OS).Specify the directory to which Ant is installed for the environment variable [ANT_HOME].(In case of Windows OS)REM AarGen.bat set ANT_HOME=C:/apache-ant(In case of Unix OS)# AarGen.sh export ANT_HOME=/apache-antExecute AarGen.
Execute the batch file included in the product.(In case of Windows OS)> %WEBSERVICE_TOOL_HOME%\AarGen.bat(In case of Unix OS)$ sh %WEBSERVICE_TOOL_HOME%/AarGen.shaar file would be output under the directory specified by destDir of AarGen.properties.
About Apache Axis2 Administration Console
It is a management console provided by Apache Axis2.You can access it by http://<HOST>:<PORT>/<CONTEXT_PATH>/axis2-web/index.jsp.By using this management console, you can view Web Service information deployed via the browser or you can deploy Web Service. Please refer to [Apache Axis2 Web Administrator’s Guide] for detail of Apache Axis2 management console.
Note
Standard user name is admin and password is axis2. These values can be changed by %CONTEXT_PATH%/conf/axis2.xml.
About services.xml
In Apache Axis2, [services.xml] is provided to set service information such as Web service name or Java class to be published as Web Service.You can deploy Web Service by placing this file to the prescribed folder or to aar file.Please refer to [Deploying Web Service] for Web Service deployment.<?xml version="1.0" encoding="UTF-8"?> <!-- サービスの設定を行います。Webサービス名がSampleServiceであることを指定しています。 --> <service name="SampleService"> <!-- Webサービスに対しての説明です。 --> <description>The Web service on the intra-mart.</description> <!-- このサービスのServiceClassがsample.web_service.provider.SampleServiceであることを指定しています。 --> <parameter name="ServiceClass">sample.web_service.provider.SampleService</parameter> <!-- このサービスのWebサービス・オペレーション実行時に認証・認可を行うことを指定しています。 --> <module ref="im_ws_auth"/> <!-- このサービスに対してのメッセージレシーバを指定しています。 --> <messageReceivers> <!-- 返却値が無いメソッドに対してのレシーバを指定しています。 --> <messageReceiver mep="http://www.w3.org/2004/08/wsdl/in-only" class="org.apache.axis2.rpc.receivers.RPCInOnlyMessageReceiver" /> <!-- 何らかの返却を行うメソッドに対してのレシーバを指定しています。 --> <messageReceiver mep="http://www.w3.org/2004/08/wsdl/in-out" class="org.apache.axis2.rpc.receivers.RPCMessageReceiver"/> </messageReceivers> </service>Specify attibute value of name attribute of <parameter> tag as ServiceClass and specify the Java’s full qualified name of Web Service implementation class inside the tag. By this, public method of class you have specified will be disclosed as Web Service Operation.Each message receiver is to do mapping between Web Service message of XML and Java object.In addition to it, message receiver to directly handle the XML called [RowXMLxxxxMessageReceiver] is also provided.Please refer to [Service Configuration] of Axis2 project for details of services.xml.Please refer to API document of Axis2 for details of message receiver.
Specifying Authorization Resource for services.xml
Authorization resource for Web Service Operation is to be specified. The authorization resource is specified in URI format.Please refer to [Authorization Specification Resource Management] for authorization resource URI.Authorization resource can be set for services or operations.Authorization resource is specified using <parameter> tag of services.xml. URI of the authorization resource should be specified inside the <parameter name="auth-uri">.<?xml version="1.0" encoding="UTF-8"?> <service name="SampleService"> <description>The Web service on the intra-mart.</description> <parameter name="ServiceClass">sample.web_service.provider.SampleService</parameter> <module ref="im_ws_auth"/> <messageReceivers> <messageReceiver mep="http://www.w3.org/2004/08/wsdl/in-only" class="org.apache.axis2.rpc.receivers.RPCInOnlyMessageReceiver" /> <messageReceiver mep="http://www.w3.org/2004/08/wsdl/in-out" class="org.apache.axis2.rpc.receivers.RPCMessageReceiver"/> </messageReceivers> <!-- サービスSampleServiceに対して認可リソースを指定します。 --> <parameter name="authz-uri">service://sample/web_service/sample</parameter> <operation name="foo"> <!-- サービスSampleServiceのオペレーションfooに対しての認可リソースを指定します。 --> <parameter name="authz-uri">service://sample/web_service/sample/foo</parameter> </operation> <operation name="bar"> <!-- サービスSampleServiceのオペレーションbarに対しての認可リソースを指定します。 --> <parameter name="authz-uri">service://sample/web_service/sample/bar</parameter> </operation> <!-- <operation name="baz"> <parameter name="authz-uri">service://sample/web_service/sample/baz</parameter> </operation> --> </service>If authorization resources are specified for both service and operation, the one specified for the operation would become valid. For the case described above, the authorization resource URI for operation bar is service://sample/web_service/sample/bar (using operation authorization resource), and the authorization resource URI for operation baz is service://sample/web_service/sample (using service authorization resource).Warning
If no authorization resource is specified for the service and the operation, the operation authorization would always be [Permitted].Warning
Authorization is valid only for Web Service that Axis2 Module [im_ws_auth] is applied.Please refer to [How to apply Axis2 Module [im_ws_auth]] for how to apply Axis2 Module [im_ws_auth].Warning
Authorization works only when the authorization setting of Web Service Provider is valid.Please refer to [<enableAuthorization> Tag] of [Web Service Provider Authentication/Authorization Setting] for details.Warning
If you specified the authorization resource, following error will occur at Web Service Operation execution time when corresponding authorization resource does not exist in the specified URI.[E.IWP.AUTHZ.DECISION.10007] Resource group is not registered.Please create the authorization resource in advance when you execute Web Service Operation.Please refer to [Adding Resources] of 「Setting Authorization in Tenant Administrator Operations Guide] for how to add the authorization resource.
Note
Following format is recommend for URI.
In case setting it for the service
service://%Application ID%/web_service/%Service Name%
In case setting it for Web Service Operation
service://%Application ID%/web_service/%Service Name%/%Operation Name%
Deploying Web Service
How to deploy Web Service is introduced.
Deployment in Directory Format
By placing arbitrary named directory where Web Service materials are stored under %CONTEXT_PATH%/WEB-INF/services directory, you can deploy Web Service.If you save library, class, property files, WSDL file, XSD file, and services.xml related to Web Service under this directory, Web Service will be deployed.Path including [services.xml] is as follows.
%CONTEXT_PATH%/WEB-INF/services/%any name%/META-INF/services.xml
Deployment of aar File Format
By placing aar file (Asix2 Archive file) in %CONTEXT_PATH%/WEB-INF/services directory, you can deploy Web Service.aar file is a file where library, class, property file, WSDL file, XSD file, and services.xml related to Web Service are saved.Please refer to [Creating aar File] for aar file creation.Please refer to [Apache Axis2 Web Administrator’s Guide Step 3: Create Archive File] of Axis2 project for aar file structure.
How to apply Axis2 Module [im_ws_auth]
How to make Web Service as the subject for authentication/authorization is described.Axis2 Module [im_ws_auth] should be applied to make it as the subject of authentication/authorization for Web Service.Followings are the ways to apply Axis2 Module [im_ws_auth].
Specifying Axis2 Module [im_ws_auth] by services.xml
By stating <module ref="im_ws_auth"/> inside the <service> tag, you can specify Axis2 Module [im_ws_auth].By stating it inside the <operation> tag, you can also specify it for each Web Service Operation.Please refer to [About services.xml].
Specifying Axis2 Module [im_ws_auth] by axis2.xml
Edit %CONTEXT_PATH%/WEB-INF/conf/axis2.xml.Remove the comment out of <service> tag shown below.Specify the Web Service name that you want to apply Axis2 Module [im_ws_auth] to <service> tag.If you want to specify multiple services, please state multiple <service> tags.<listener class="jp.co.intra_mart.foundation.web_service.axis2.observers.EngageModuleAxisObserver"> <parameter name="engageModule"> <module ref="im_ws_auth"> <!-- <service>ExampleWebServiceName</service> --> </module> </parameter> </listener>
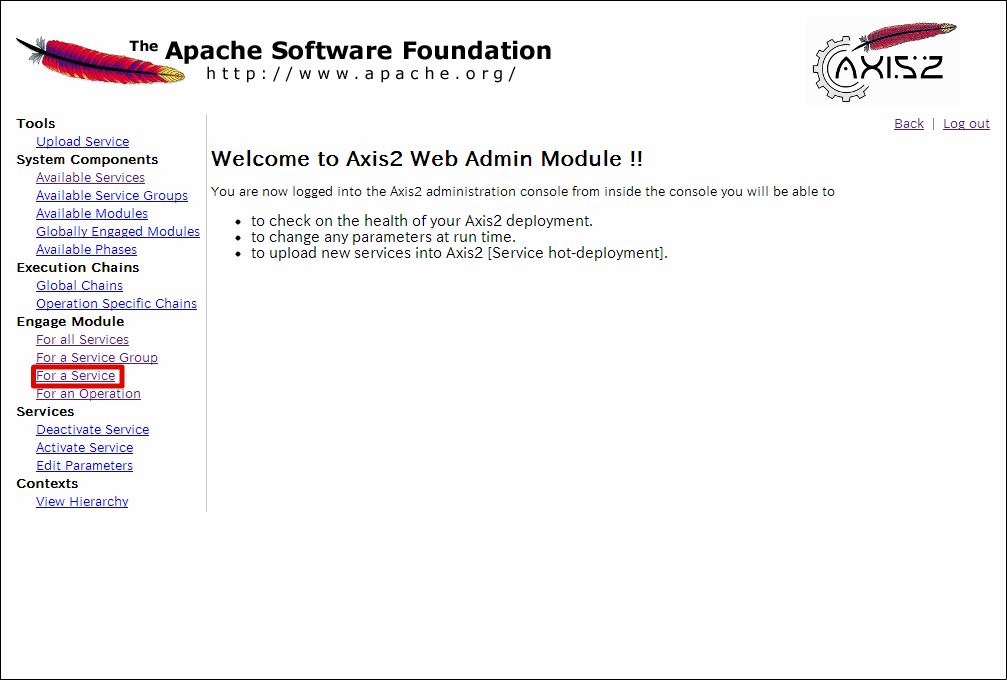
Specifying Axis2 Module [im_ws_auth] by Apache Axis2 Administration Console
You can also apply Axis2 Module [im_ws_auth] by using administration console function of Apache Axis2.Please refer to [About Apache Axis2 Administration Console] for administration console.
Access the one below for the server in operation.
http://<HOST>:<PORT>/<CONTEXT_PATH>/axis2-web/index.jsp
Click [Administration].
Click [For a service] in Engage module.
Select [im_ws_auth] in Select a Module:, and select any service in Select a Service:.
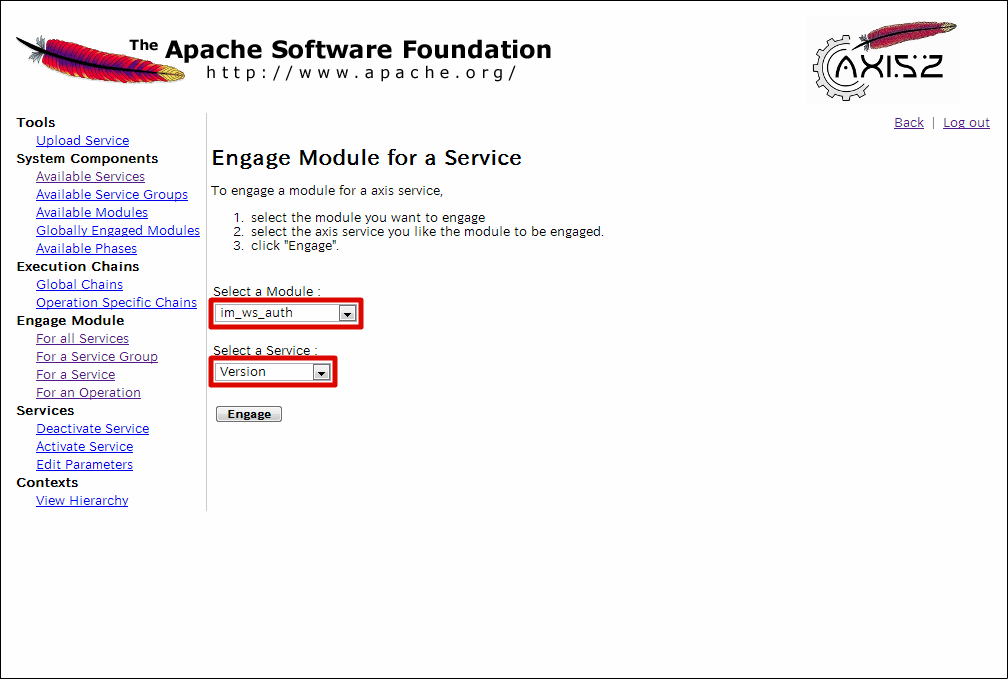
Click [Engage].
Axis2 Module [im_ws_auth] would be applied for the service you specified in the above.
Warning
For the Axis2 Module that uses administration console, settings would be initialized if you restart the application server.
About WSDL in Distributed Environment
End point that is stated in WSDL which was automatically generated by Apache Axis2 depends on the name of the host where cluster is being operated.Therefore, if you query WSDL in distributed environment, application server host dispatched by the Web server could be obtained as an end point.In order to avoid this, you should take either one of the following measures :
Stop automatic generation of WSDL.
If you perform Deployment in Directory Format, you should create WSDL in which the end point via Web server is stated in advance, and place it in %CONTEXT_PATH%/WEB-INF/services/%any name%/META-INF/%Web service name%.wsdl.Change the end point specified by Web Service Client to the one via Web server.
Note
If Script Development Model API SOAPClient is used, you should change the URL specified to the end point of 4th argument of SOAPClient to the one via Web server.
Note
If you have generated stub from WSDL, please change URL specified as an end point specified by stub constructor to the one via Web server.
Adding the Authentication Module
In order to add authentication module, add <authModule> Tag to axis2.xml.Please refer to [Web Service Provider Authentication/Authorization Setting] for axis2.xml.Shown below is the setting when you want to add Authentication Module for Unauthenticated User (jp.co.intra_mart.foundation.web_service.auth.impl.WSAuthModule4Anonymous) as authentication module, which is not set as standard.<axisconfig name="AxisJava2.0"> <!-- ================================================= --> <!-- Parameters for intra-mart --> <!-- ================================================= --> <parameter name="jp.co.intra_mart.foundation.web_service"> <enablePlainTextPassword>false</enablePlainTextPassword> <!-- authModuleタグ追加 --> <authModule class="jp.co.intra_mart.foundation.web_service.auth.impl.WSAuthModule4Anonymous" /> <authModule class="jp.co.intra_mart.foundation.web_service.auth.impl.WSAuthModule4WSSE"> <expire>300</expire> </authModule> <enableAuthentication>true</enableAuthentication> <enableAuthorization>true</enableAuthorization> <showSoapFaultDetail>true</showSoapFaultDetail> <wsUserInfoArgumentName>wsUserInfo</wsUserInfoArgumentName> </parameter> <!-- 省略 --> </axisconfig>
SOAP Message Monitoring
Monitoring method of Web Service messages that are exchanged during Web Service execution is introduced.
Monitoring by TCPMon
How to use message monitoring tool [TCPMon] provided in Apache Web Services Project is introduced.Please refer to [TCPMon] for the details about TCPMon.
- TCPMon Download and Decompression
Download TCPMon from [TCPMon Download Page] and decompress the archive. This directory is %TCPMON_HOME%.
TCPMon Startup and Setting
Execute %TCPMON_HOME%/build/tcpmon.bat (or tcpmon.sh) and start TCPMon.Display [Admin] tab and set appropriate port number to Listen Port. When you specify the port number, it should not overlap with the one of other services.In this document, it is specified to [9999] as an example.Set the host information where the Eb service is to be deployed to Target Hostname and Target Port.In this document, Target Hostname is [localhost] and Target Port is [8080] as an example.After that, click [Add].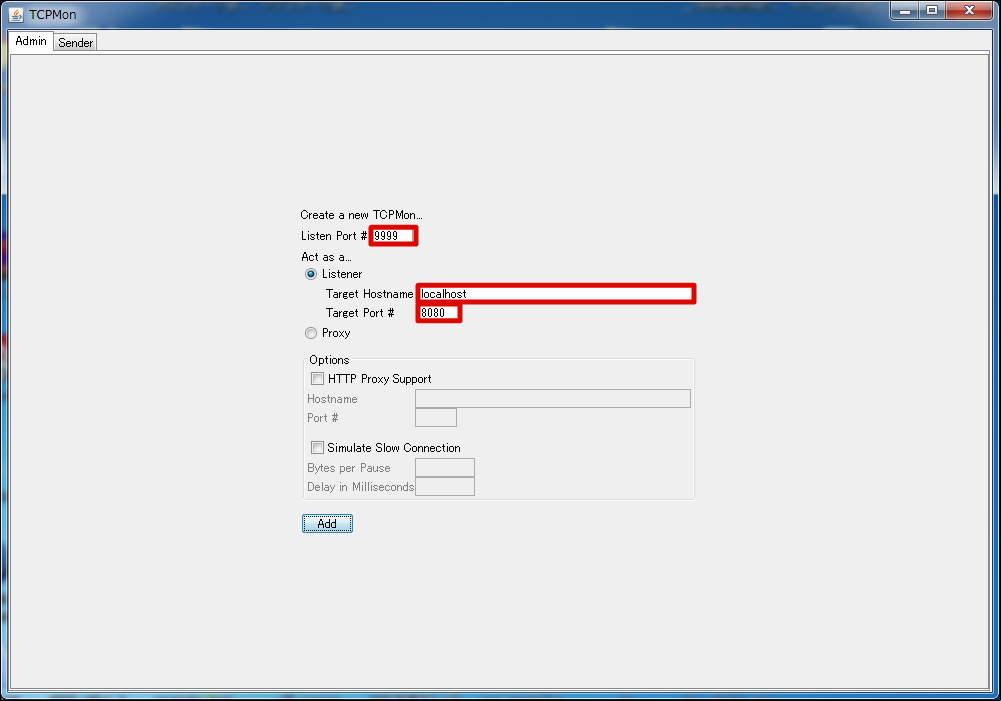
Change end point by Web Service Client.
Change the end point port number to be specified by Web Service Client at execution time to Listen Port., which you have specified before.
Note
If Script Development Model API SOAPClient is used, you should change the port number that you have specified in the end point of the 4th argument of SOAPClient to the port number of Listen Port.
Note
If you have generated the stub from WSDL, please change the port number specified in the end point specified by the stub constructor to the port number of Listen Port.
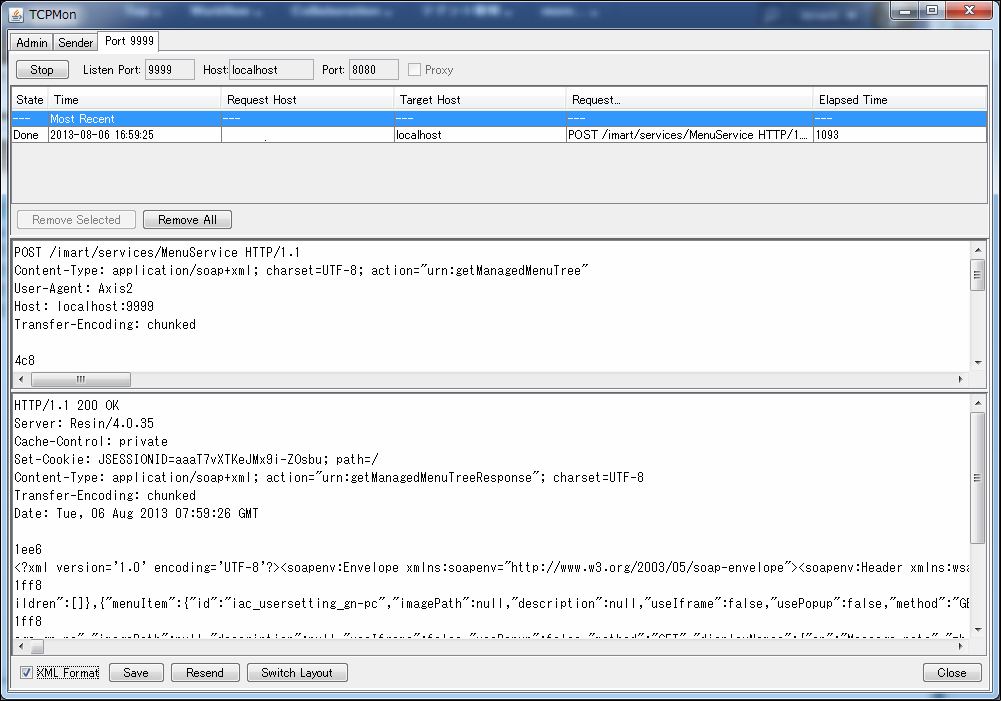
View the SOAP messages from [Port <Port Number of Listen Port>] tab.
About Web Service that does not require Authentication/Authorization
In case you create Web Service that does not require authentication, authorization, or log-in, you do not need to apply Axis2 Module [im_ws_auth].Specifically, by not setting <module ref=”im_ws_auth”/> of set services.xml, corresponding module will not be applied.Other than not applying Axis2 Module [im_ws_auth], you can create it in the same method as Web Service, which is described in this document.Please refer to [How to apply Axis2 Module [im_ws_auth]] for applying Axis2 Module [im_ws_auth].Note
It is not necessary to receive User Information as an argument for each Web Service Operation either.