Basic (First Programming in intra-mart Accel Platform)
In this section as an introduction to development on intra-mart Accel Platform, users will experiencethe development flow of TERASOLUNA Global Framework on intra-mart Accel Platform through the creation of Hello Worldusing TERASOLUNA Global Framework on intra-mart e Builder for Accel Platform.
Tutorial Flow
Prerequistes
intra-mart e Builder for Accel Platform has been already installed.
intra-mart Accel Platform has been installed, and initial setting has been completed.
In the Juggling module configuration, please include TERASOLUNA Global Framework on Accel Platform in the base module,and set [Integration Test Environment] as an execution environment.
Creation of Hello World on intra-mart e Builder for Accel Platform
Take the following steps and create Hello World.
Step1:Project Creation and Setting
Module project is created on intra-mart e Builder for Accel Platform, and project setting is made.In this section an example of creating the module project named [hello_terasoluna] will be described.For the project creation and setting method, please refer to the {Module Project Creation] section and[Project Setting] section of [intra-mart e Builder for Accel Platform User Operations Guide].
Step2:Bean Definition File applicationContext.xml Creation
Project unique Bean definition file is created.Here, it is created as src/main/resources/META-INF/spring/applicationContext-hello_terasoluna.xml.By this setting, the classes under the specified package will be treated as the components of Spring.In the example below, root package is “sample.tgfw”.<?xml version="1.0" encoding="UTF-8"?> <beans xmlns="http://www.springframework.org/schema/beans" xmlns:xsi="http://www.w3.org/2001/XMLSchema-instance" xmlns:context="http://www.springframework.org/schema/context" xsi:schemaLocation="http://www.springframework.org/schema/beans http://www.springframework.org/schema/beans/spring-beans-3.2.xsd http://www.springframework.org/schema/context http://www.springframework.org/schema/context/spring-context-3.2.xsd"> <!-- Top-level package of Element which is the subject of DI component --> <context:component-scan base-package="sample.tgfw" /> </beans>Note
When the Bean definition file is created, it shoud be placed with the xml file name which starts applicationContext to the folder below.Folder:src/main/resources/META-INF/spring/ or src/main/webapp/WEB-INF/classes/META-INF/spring/Example of File Name: applicationContext-foo.xml
Step3:Input Screen Creation
Input screen ( index.jsp ) is created.Under src/maim/webapp of the project, please create the folder at /WEB-INF/views/sample/tgfw/hello layer.Please create the file named [index.jsp] under the created folder, and implementthe source code below.<%@ page contentType="text/html; charset=UTF-8" pageEncoding="UTF-8" %> <%@ taglib prefix="imui" uri="http://www.intra-mart.co.jp/taglib/imui"%> <%@ taglib prefix="form" uri="http://www.springframework.org/tags/form" %> <%@ taglib prefix="spring" uri="http://www.springframework.org/tags" %> <!-- HEAD tag --> <imui:head> <title>Hello, World</title> <script type="text/javascript"> $(function() { $('#button').click(function() { $('#helloForm').submit(); }); }); </script> </imui:head> <!-- Title displayed on the screen --> <div class="imui-title"> <h1>Hello, World (TERASOLUNA)</h1> </div> <!-- Input Screen --> <div class="imui-form-container-narrow"> <p> <label for="name">Please input the name. </label> </p> <!-- Input From setting Enter path to Result Display Screen to action (call output method of Hello action) --> <form:form action="sample/tgfw/hello/output" modelAttribute="helloForm"> <div> <!-- Text Box --> <imui:textbox type="text" value='' id="name" name="name" size="10" /> </div> <!-- submit button --> <imui:button name="button" value="Hello!!" class="mt-10" id="button" /> </form:form> </div>Warning
Character code should be made to UTF-8, and stored.
Step4:Output Screen Creation
Output screen ( output.jsp ) is created.Under src/maim/webapp of the project, please create the file named [ output.jsp ]under /WEB-INF/views/sample/tgfw/hello, and implement the source code below.<%@ page contentType="text/html; charset=UTF-8" pageEncoding="UTF-8" %> <%@ taglib prefix="imui" uri="http://www.intra-mart.co.jp/taglib/imui"%> <%@ taglib prefix="form" uri="http://www.springframework.org/tags/form" %> <%@ taglib prefix="spring" uri="http://www.springframework.org/tags" %> <%@ taglib prefix="f" uri="http://terasoluna.org/functions" %> <%@ taglib prefix="t" uri="http://terasoluna.org/tags" %> <!-- HEAD tag --> <imui:head> <title>Hello, World</title> </imui:head> <!-- Title displayed on the screen --> <div class="imui-title"> <h1>Hello, World (TERASOLUNA)</h1> </div> <!-- Tool Bar (Place the button to return to previous screen) --> <div class="imui-toolbar-wrap"> <div class="imui-toolbar-inner"> <ul class="imui-list-toolbar"> <li> <!-- [Back] button icon, index method of HelloController is called. --> <a href="sample/tgfw/hello" class="imui-toolbar-icon" title="back"> <span class="im-ui-icon-common-16-back"></span> </a> </li> </ul> </div> </div> <!-- Output Result --> <div class="imui-form-container-narrow"> <label> <imui:textbox type="text" value="${f:h(helloForm.name)}" id="name" name="name" size="10" class="imui-text-readonly" readonly /> </label> </div>Note
In the tags stated in HTML files that operate on intra-mart Accel Platform, please do not state <HTML> or <BODY>, and use <imui:head> as <HEAD>. Please refer to UI (Design Guide Line) for detail.
Warning
Character code should be made to UTF-8 and stored.
Step5:Form Class Creation
Warning
Character code should be made to UTF-8 and stored.
Step6:Controller Class Creation
Controller Class which processes the input screen and output screen is created.Here, you should make the package name as sample.tgfw.app.hello and make the class name as HelloController.Please set @Controller annotation and @RequestMapping annotation to the class.Please set @RequestMapping annotation to the method which corresponds to the URL.Source code stated in Controller should be as follows.package sample.tgfw.app.hello; import org.springframework.stereotype.Controller; import org.springframework.web.bind.annotation.RequestMapping; @Controller @RequestMapping("sample/tgfw/hello") public class HelloController { @RequestMapping public String index() { return "sample/tgfw/hello/index.jsp"; } @RequestMapping("output") public String output(HelloForm helloForm) { return "sample/tgfw/hello/output.jsp"; } }Warning
Character code should be set to UTF-8 and stored.Note
RequestMappingHandlerMapping and RequestMappingHandlerAdapter are used to support request and method.It is necessary that applicationContext*.xml should have the mvc:annotation-driven setting.In TERASOLUNA Global Framework on Accel Platform, this setting is made to applicationContext-im_tgfw_web.xml as standard.Creation of Hello World is completed at this point.Source code created thus far has been deployed to the appropriate folder on Resin server according to the project setting.When you migrate to the system operations environment, you should make the created project to user definition module or deploy the source code and apply it.
Registration and Screen Display
Step1:Menu Registration
Sample program which is created above is registered to the site map and is actually executed.Resin is started, and log-in is made to Accel Platform as tenant administrator.URL of log-in screen will be [ http://<HOST>:<PORT>/<CONTEXT_PATH>/login ].Thereafter, maintenance screen of the menu is displayed, and the menu is set as follows.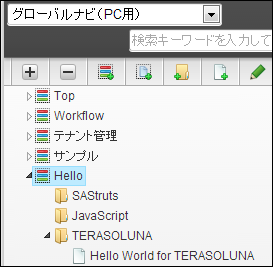 Information below is entered to the new item created here.
Menu Item (Japanese) Hello World for TERASOLUNA URL sample/tgfw/hello Authorization setting should be made to the [ Hello ] group which is created to view the menu.In this section setting is made to the Hello group to permit access by the guest users and authenticated users.Please refer to Authorization for detail.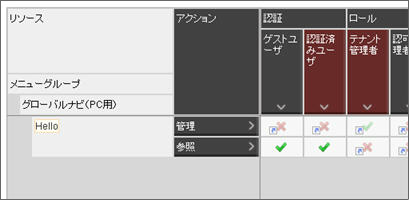
Step2:Hello World Operation
Reflect the menu that has been set and execute it.You can make a selection from the site map as shown in the image below.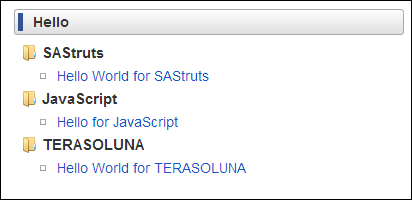 If you click the menu item which was registered at the site map, input screen is displayed.
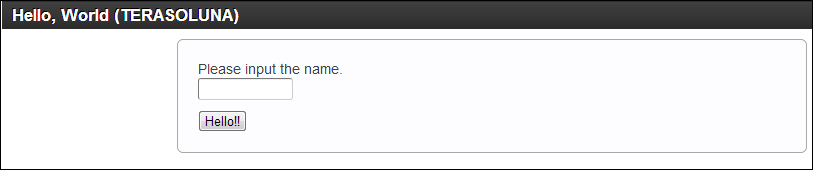 If you enter the name to the text box, it will be displayed on the result screen.
 If you click the [Back] icon on the upper part of result screen, it returns to the input screen.
Note
In this tutorial, following points have been confirmed.
Reference
If you want to try right away, please import the project already created.
Hello World, which was created in this tutorial, can be obtained from hello_terasoluna.zip as the module project [hello_terasoluna].This downloaded zip file can be imported to e Builder by the procedures below, and can be immediately executed for confirmation.Please first import it to e Builder by the following procedures.
- Start e Builder
- Open Import Wizard Screen from the Tool Bar Menu [File]-[Import]
- Select Item [General]-[Existing Project to Workspace], and Go Next
- Select downloaded zip file from the item [Archive File Selection], and click [Finish] button
Module project [hello_terasoluna] is imported by the procedures above.Next, set the Web archive directory by the module project property, and start the debug server. After the debug server is started, if you directly specify the URL from the browser as below and access it, input screen is displayed, and the operation of Hello World can be confirmed.http://<HOST>:<PORT>/<CONTEXT_PATH>/sample/tgfw/hello