4.6. Apache Solr
Topics
4.6.1. Overview
Apache Solr is required to utilize [IM-ContentsSearch for Accel Platform].
On im-Juggling you should select [Standard Application]-[IM-ContentsSearch for Accel Platform] module, and then if you are to use [IM-ContentsSearch for Accel Platform], it is necessary to build [Apache Solr] server.
Warning
You can select any server for building [Apache Solr]. However, since [Apache Solr] will generate large volume of disk accesses, response degradation may result if it is built in the same server hardware where [intra-mart Accel Platform] has been set up. Therefore, it is strongly recommended to build it in a separate server in the operations environment.
4.6.2. Prerequisites
- [Java] needs to have been installed.
- In case [Apache Solr] is set up on [Resin], [Resin] needs to have been installed.
- In case [Apache Solr] is set up on [Tomcat], [Tomcat] needs to have been installed.
4.6.3. Setup
[IM-ContentsSearch for Accel Platform] provides a setup tool for [Apache Solr].Following processes can be executed by using the setup tool. On [Apache Solr] which was built by the setup tool, customization solely for [IM-ContentsSearch for Accel Platform] is considered as completed.- Build and Launch using the application server [Jetty] (mainly for development or for demonstration)- Generating group of files to be built on the application server [Resin]- Generating group of files to be built on the application server [Tomcat]
Obtain [Apache Solr] setup tool.
[Apache Solr] setup tool can be downloaded from the URL below :
You can also use ./Products/tools/iap/im_contents_search/solr_setup.zip in the setup disk.
After obtaining the setup tool, please unzip the <solr_setup.zip> file to any path.
<*> For unzipping the compressed file, please choose the tool that can unzip the file in zip format.
Note
In this document the directory below is specified as an example.
[C:/solr]
Open Command Prompt and move to the path below.
C:/solr/solr_setup
Enter the setup command as shown below and hit the <Entrer> key. Setup tool is executed, and the command list and its descriptions for the setup tool are displayed.
<In case of Windows> C:/solr/solr_setup> setup.bat<In case of Linux> [ root@localhost solr]# ./setup.shNote
This is an example of Windows environment.
C:\solr\solr_setup>
C:\solr\solr_setup> setup.bat
Buildfile: C:\solr\solr_setup\build\build.xml

usage:
     [echo] Welcome to the Apache Solr Installation!
     [echo] Use '' to display usage
     [echo] Use 'usage' to display usage
     [echo] Use 'jetty' to download the jetty zip file, solr zip file and the solr.war and unzip the zip files and config the jetty port
     [echo] Use 'jetty.start' to download the jetty zip file, solr zip file and the solr.war and unzip the zip files and config the jetty port and start the jetty
     [echo] Use 'resin' to download the solr zip file and the solr.war for resin and unzip the zip file
     [echo] Use 'tomcat' to download the solr zip file and the solr.war for tomcat and unzip the zip file

BUILD SUCCESSFUL
Total time: 1 second

C:\solr\solr_setup>
Descriptions of each command in the Setup Tool are shown below.Each command is specified as a parameter of setup.bat (in case of Windows) or setup.sh (in case of Linux).Example: C:/solr/solr_setup> setup.bat jetty.start
<Setup Tool Command and its Description> Command
Execution Contents
(None)
Descriptions of setup tool are displayed.
usage
Descriptions of setup tool are displayed.
jetty
Build Jetty in which [Apache Solr] is available where the startup port has been changed to the port specified by ./build_user.properties.
jetty.start
After executing the jetty command, start the application server Jetty.
resin
Group of files that are necessary for the setup of Resin are generated to ./dist directory.
tomcat
Group of files that are necessary for the setup of Tomcat are generated to ./dist directory.
Here, we would like to continue the explanation assuming setup.bat resin is executed.
When you execute C:/solr/solr_setup> setup.bat resin, resin directory is created under ./dist directory.
Note
Part of the screen which is displayed after running setup.bat resin is shown.
      [get] ....................................................
      [get] ....................................................
      [get] ....................................................
      [get] ....................................................
      [get] ....................................................
      [get] ....................................................
      [get] ....................................................
      [get] ....................................................
      [get] ...........
      [get] last modified = Thu Sep 27 01:25:24 JST 2012

md.resin.webapps:
     [echo] make resin webapps dir(../dist/resin/resin/webapps)...
    [mkdir] Created dir: C:\solr\solr_setup\dist\resin\resin\webapps

copy.resin.solr.war:
     [echo] copy the solr.war from ./download/solr.war to ../dist/resin/resin/webapps...
     [copy] Copying 1 file to C:\solr\solr_setup\dist\resin\resin\webapps

common.display.readme:
     [echo] ==========================================================================================================
     [echo] [*] Definition
     [echo]     Directory where <%resin_home%>:Application Server Resin is installed
     [echo]
     [echo] [*] Solr Placement and Setting
     [echo]     Please copy /dist/resin_solr/resin/*.* to <%resin_home%>.
     [echo]
     [echo] [*] Solr Home Location Setting
     [echo]     Add the contents of /dist/resin_solr/env-entry.txt to <%resin_home%>/conf/resin.xml.
     [echo]
     [echo]     Copy the contents of env-entry.txt of resin.xml to the location before </resin>.
     [echo]
     [echo] ==========================================================================================================
     [echo] C:\solr\solr_setup\dist\resin\readme.txt

BUILD SUCCESSFUL
Total time: 11 seconds

C:\solr\solr_setup>
When the execution of setup tool is completed, group of files that are necessary for the setup are generated to ./dist directory.
If you use Resin or Tomcat as an application server, please proceed and perform the steps shown in the readme.txt of the file (same contents as the ones displayed when the command is completed). If you use Jetty as an application server, it can be executed as it is since the main body of Jetty is stored in the ./dist/jetty directory.
Setup is now completed.
4.6.4. Startup of [Apache Solr], Connection to Admin Screen, Stop
Start the application server where [Apache Solr] has been setup.
Since [Apache Solr] is started/stopped at the same timing the application server is started/stopped, please refer to the usage information of respective application server for ways to start/stop or services.
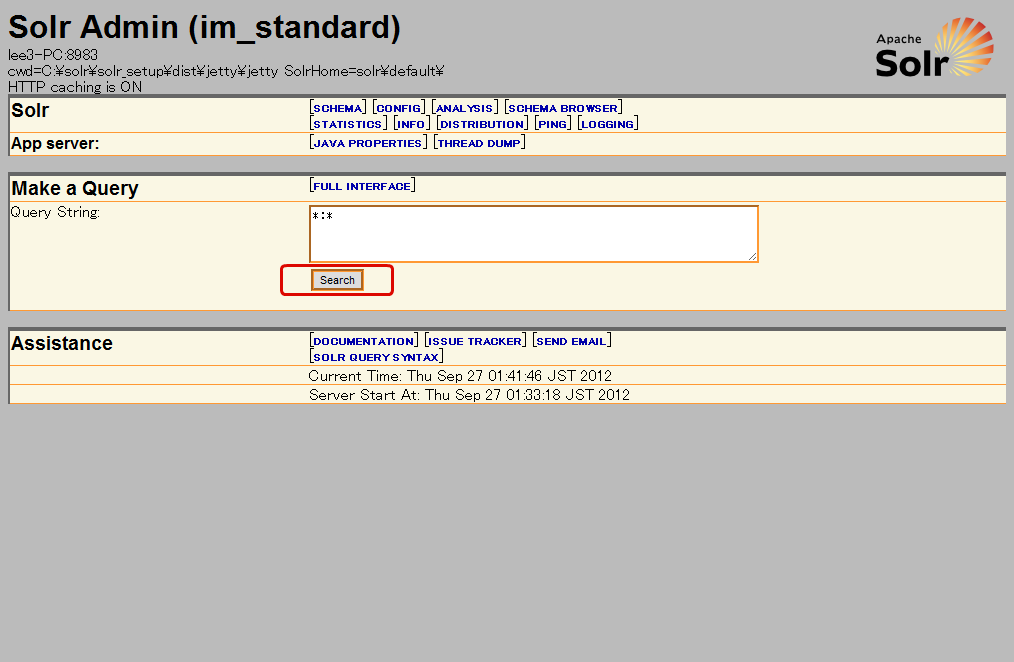
Connect to the Admin screen of [Apache Solr], and confirm that the [search] button works correctly.
For example, connection is made to the Admin screen of [common_apache_apachesolr] which is set up in Jetty.
Stop the application server where [Apache Solr] has been set up.
4.6.5. About the Java version to be used
There are remarks about the Java version to be used when Apache Solr is utilized.In case Java SE Development Kit 7u40 version or above is used, it is necessary to specify the startup parameter below in JVM.-XX:-UseSuperWordIf the startup parameter shown above is not specified, index data may be broken and it may not function properly. Because of this known defect, you must specify this parameter.This problem would not occur, if the version prior to Java SE Development Kit 7u25 is used.Please refer to the setting information of the respective application server to be used to learn how JVM startup parameter is specified.In case you utilize Jetty which is included in the setup tool, you can take the following steps.
- Execute setup.bat jetty or setup.sh jetty using the setup command previously stated.
- Open the startup script for the OS by the editor.
- in case of Windows: [solr_setup\dist\jetty\jetty\startup.bat]
- in case of Linux: [solr_setup/dist/jetty/jetty/startup.sh]
- Please confirm that there is java -jar start.jar stated in each of these files.
- Please rewrite the identified statement to java -XX:-UseSuperWord -jar start.jar .
For the details of defect, please refer to the item below[Irregular crash or corrupt term vectors in the Lucene libraries.]which is stated in the release note of Java SE Development Kit 7u40.Note
Update Release Notes - Java SE Development Kit 7, Update 40