Authorization
Topics
- Setting Access Authorization to Screens
- Authorization
- Authorization Setting Method for accessing the screen
- Authorization Setting Flow
- Step 1:Associate authorization to @RequestMapping method
- Step 2:Register resource group and resource of authorization.
- Step 2-1:Register resource group and resource of authorization using Authorization Setting Screen
- Step 2-2:Register resource group and resource of authorization using Job.
- Step 3:Set authority to resource.
- Remarks about Menu Setting and Authorization
Setting Access Authorization to Screens
@RequestMapping()
public String index() {
    return "index.jsp";
}
Access to the screen is made possible by setting the Controller class.However, without further processing, authorization process would be omitted when the @RequestMapping method is processed, and anybody can display the screen.In the actual system operations, access authorization is set most of the times and display the screen for only the particular users and enforce access limitation.In this chapter procedures for displaying the prepared screen only to the particular useres by utilizing the authorization function of intra-mart Accel Platform are described.For the details about Controller class and @RequestMapping method, please refer to http://docs.spring.io/spring/docs/3.2.4.RELEASE/spring-framework-reference/html/mvc.html#mvc-controller
Authorization
Summary of Authorization
Authorization is a mechanism to control access to the resource that the users identified by the authorization function have requested.intra-mart Accel Platform provides a common mechansim of authorization function which makes [Allow] or [Disallow] judgment on [Who], [What] and [How].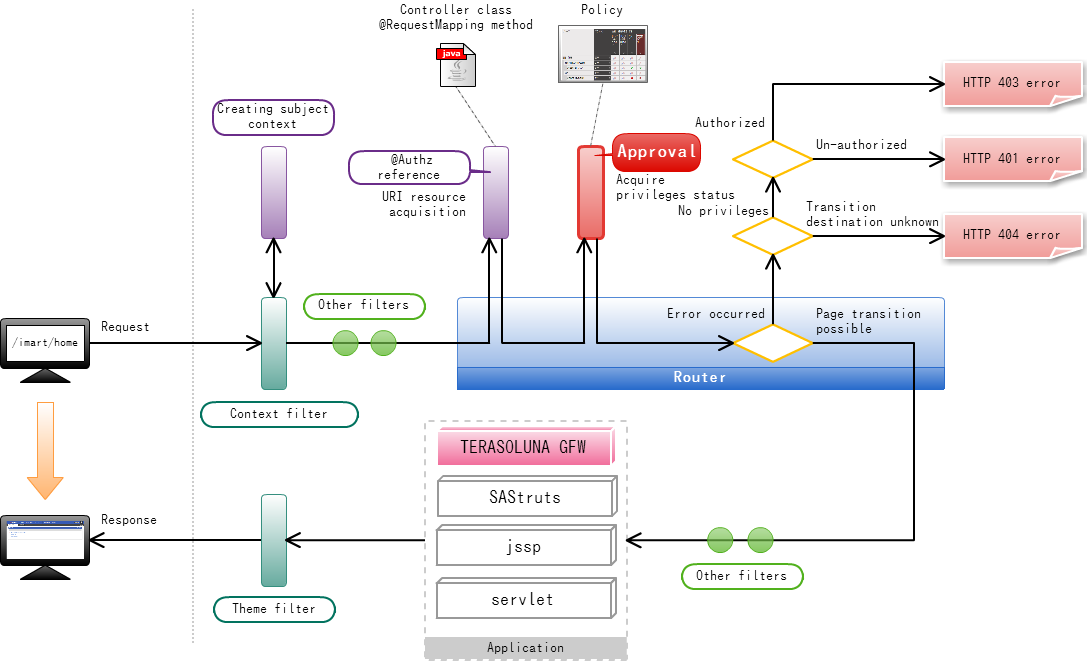
Subject
[Subject] in authorization indicates the [Who] part.In intra-mart Accel Platform target persons the authorization is given will be set by the combination of [User], [Role], [Company/Department], [Post], [Public Group], and [Public Group/Role].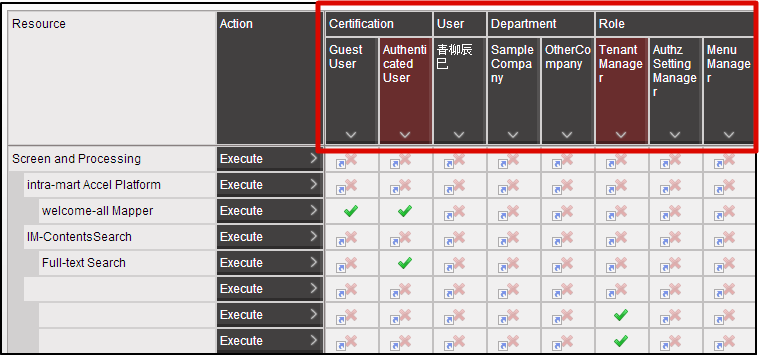
Resource and Resource Group
[Resource] in authorization indicates the [What] part.For example, it may indicate service-type resource such as screen or web service, and data-type resource such as menu or portal.Resource can have parent-child relationship by using [Resource Group].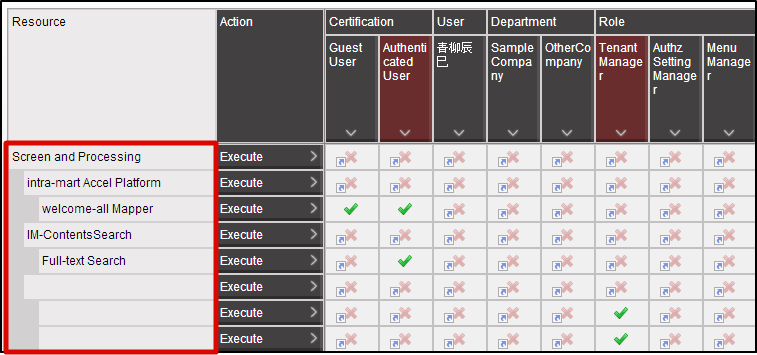
Resource Type and Action
[Action] in authorization indicates the [How] part.Contents of action will be determined by the resource type.For example, screen has only 1 action called [Run].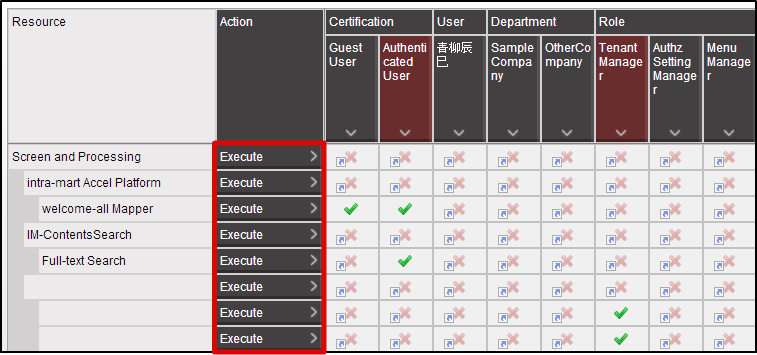
Policy
[Policy] in authorization indicates the [Allow] and [Disallow] part.Policies can be set for the number of combinations for each subject resource action.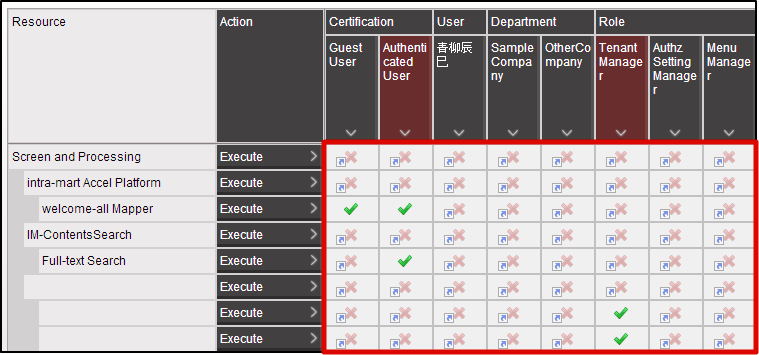 If the policy has not been set yet, authorization of the resource group in the parent layer will be inherited.If the policy of the resource group in the uppermost layer has not been set, it is treated as [Disallow].
Authorization Setting Method for accessing the screen
Authorization Setting Flow
Router will submit inquiry on authority to the Authorization based on the information which was set in @RequestMapping method.When the inquiry is made, URI which is allocated to each resource will be used as a key.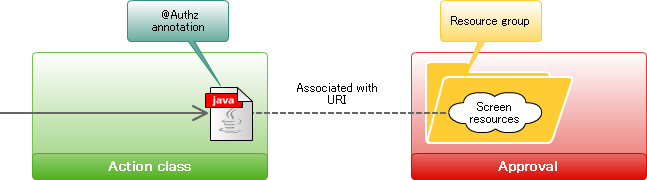 Following are the steps for the authorization setting of screens.
- Associate authorization to the @RequestMapping method.
- Register resource group and resource of authorization.
- Set authority to resource.
Step 1:Associate authorization to @RequestMapping method
@Authz annotation should be put to the @RequestMapping method for association with authorization.@Authz(uri = "service://sample/foo", action = "execute") @RequestMapping() public String index() { return "index.jsp"; }In case of screen, character string that starts with “service://” should be specified as uri property.Here the character string “service” indicates [Resource Type] and represents [Screen/Process].For the resource type “service”, only 1 action called “execute” is available.Therefore, “execute” should be specified as action attribute.
Step 2:Register resource group and resource of authorization.
In order to associate the screen created in the sample to the authorization, resource group and resource of the configuration below should be registered to the authorization.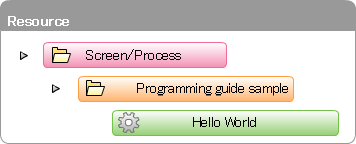 Resource group and resource can be registered by [Registration from Authorization Setting Screen] or [Registration from File using Job].If resource is to be registered from the authorization setting screen, please do the operations in Step 2-1:Register resource group and resource of authorization using Authorization Setting Screen .If it is to be registered from the file using job, please do the operations in Step 2-2:Register resource group and resource of authorization using Job..
Step 2-1:Register resource group and resource of authorization using Authorization Setting Screen
Log-in to intra-mart Accel Platform as Tenant Administrator.http://<HOST>:<PORT>/<CONTEXT_PATH>/loginClicl [Site Map]→[Tenant Management]→[Authorization].Authorization Setting Screen opens. Click [Start Authority Setting] button. First, resource group should be registered.When you place the mouse cursor on the [Screen/Process] of Resource column, icon will be displayed on the right. Then, click the icon.
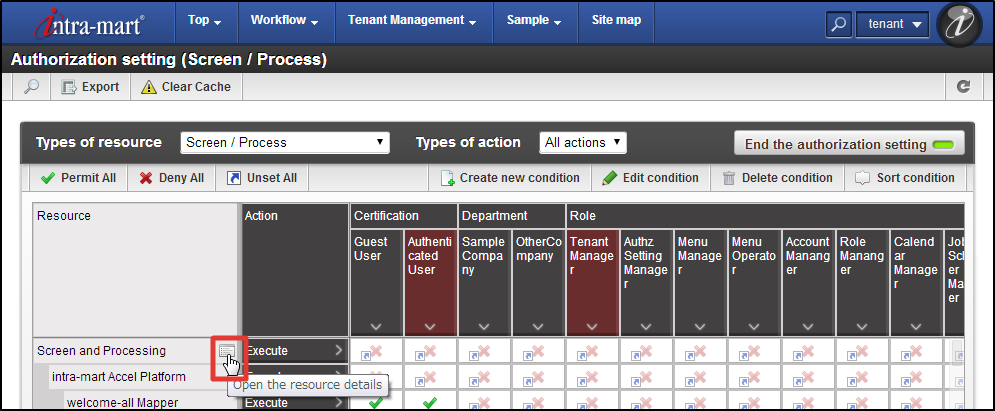 Click [Newly Create Subordinate Resource] in the [Resource Detail] dialog.
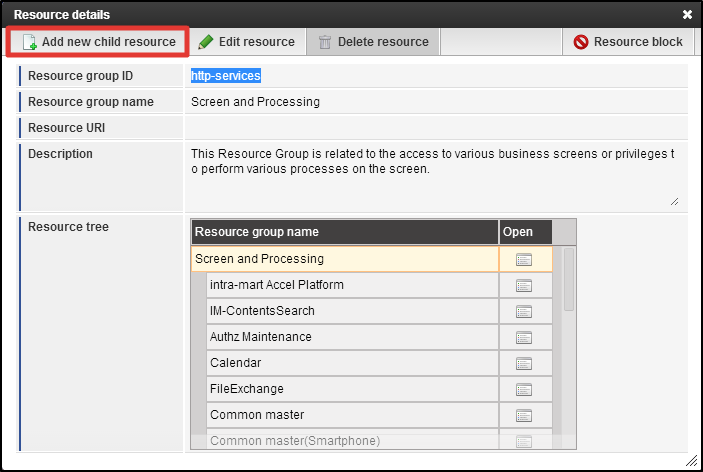 Enter [guide-sample-service] to the text box of [Resource Group ID].Enter [Programming Guide Sample] to the uppermost text box of [Resource Group Name].You can leave [Resource URI] and [Description] as blank.Click [OK] button. Now, resource group has been registered.
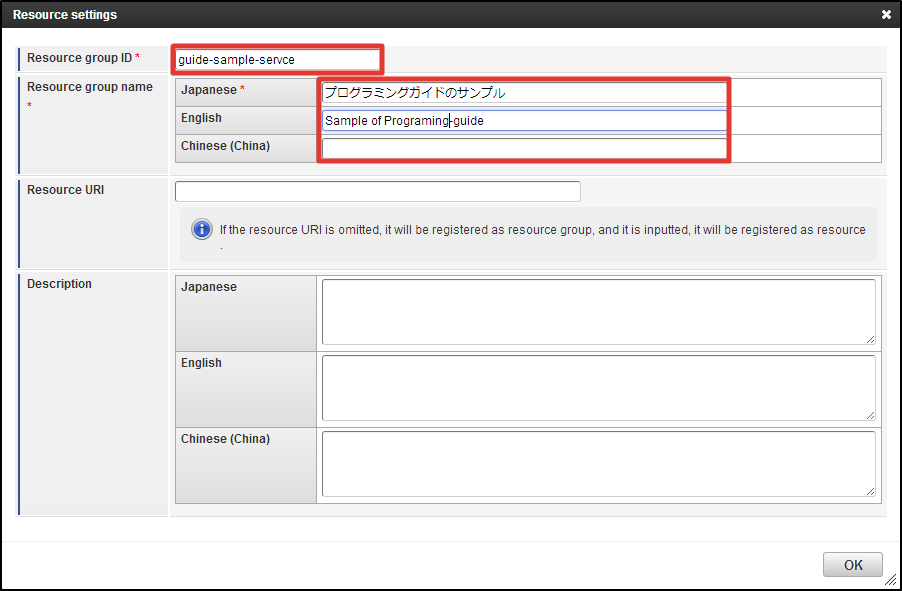
Note
Any arbitrary ID can be specified to [Resource Group ID].By doing the registration keeping [Resource URI] as blank, you can create a resource group for grouping resources.In the actual development phase, it is recommended to fill in the [Description] to explicitly show to the authorization administrator which screen/process/data are represented by the registered resource group.Search for the [Programming Guide Sample] created from the [Resource Layer] in the [Resource Detail] dialog.Click the [Open] icon on the right on the same row.[Programming Guide Sample] is now in the selected state.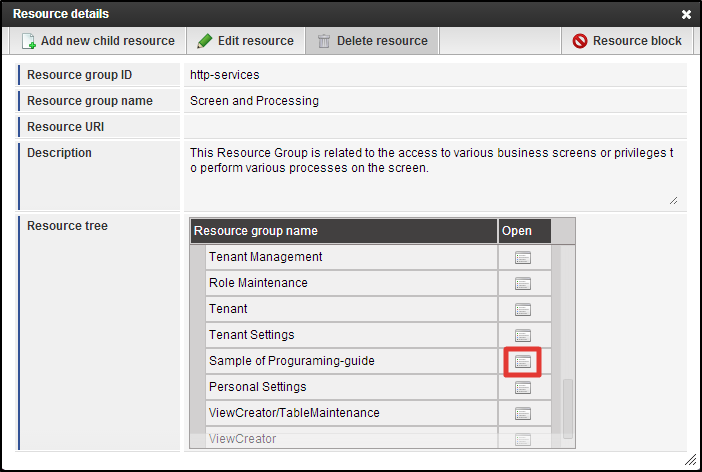
Warning
In case resource has not been registered under the resource group, it is not displayed on the grid of authority setting.It is displayed in the [Resource Layer].Note
In the [Resource Layer] the parent layer and child layer (1 layer) of the selected resource (group) are displayed.As a next step, resource is registered.Click [Newly Create Subordinate Resource] in [Resource Detail] dialog.Enter [guide-sample-foo-service] to the text box of [Resource Group ID].Enter [Hello World] to the uppermost text box in [Resource Group Name].Enter [service://sample/foo] to the text box in [Resource URI].You can leave [Description] as blank.Click [OK] button. Now, resource has been registered.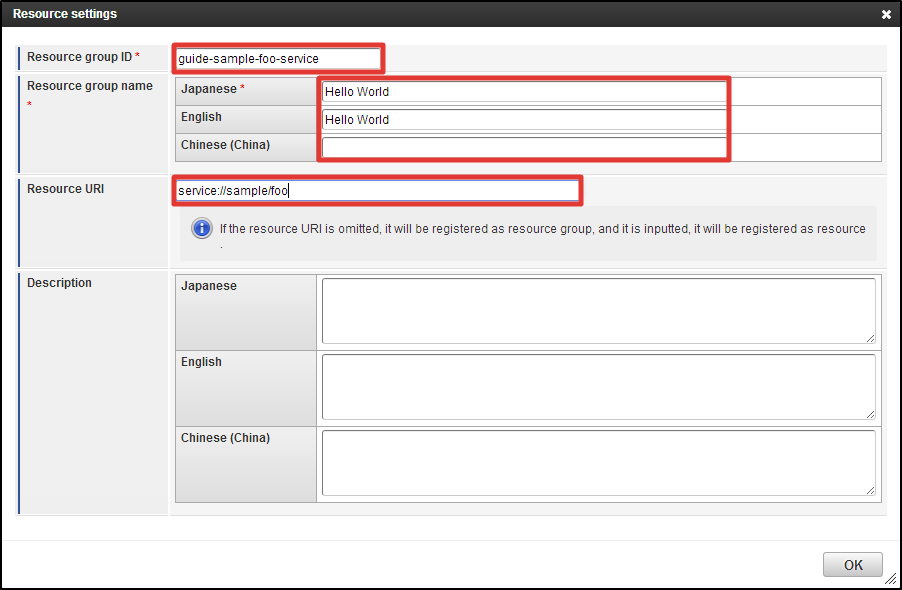
Note
Any arbitrary ID can be specified to [Resource Group ID].Same value with the uri attribute of authz tag specified by the routing table should be specified to [Resource URI].By entering and registering [Resource URI], resource associated with the resource such as screens can be created.In the actual development phase, it is recommended to fill in the [Description] to explicitly show to the authorization administrator which screen/process/data are represented by the registered resource.Click the [X] icon in the upper right of [Resource Detail] dialog, and close the dialog.Now, resource group and resource which are necessary for the screen display have been registered to the authorization.Then, please proceed to the Step 3 operations.
Step 2-2:Register resource group and resource of authorization using Job.
Create the empty <authz-resource-group.xml> file, enter the following statements, and save it.<?xml version="1.0" encoding="UTF-8"?> <root xmlns="http://www.intra-mart.jp/authz/imex/resource-group" xmlns:xsi="http://www.w3.org/2001/XMLSchema-instance" xsi:schemaLocation="http://www.intra-mart.jp/authz/imex/resource-group authz-resource-group.xsd"> <authz-resource-group id="guide-sample-service"> <display-name> <name locale="en">Programming Guide Sample</name> </display-name> <resource-group-description> <description locale="en">Programming Guide Sample</description> </resource-group-description> <parent-group id="http-services" /> </authz-resource-group> </root>Warning
Set character code to UTF-8 and save it.Note
Arbitrary ID can be specified to the id attribute of authz-resource-group tag.Please specify “http-services” to the id attribute of parent-group tag.Description of resource group can be specified to the resource-group-description tag. This tag may be omitted.In the actual development phase, it is recommended to specify the Description to explicitly show to the authorization administrator which screen/process/data are represented by the registered resource group.Then, create the empty <authz-resource.xml> file, enter the following statements, and save it.<?xml version="1.0" encoding="UTF-8"?> <root xmlns="http://www.intra-mart.jp/authz/imex/resource" xmlns:xsi="http://www.w3.org/2001/XMLSchema-instance" xsi:schemaLocation="http://www.intra-mart.jp/authz/imex/resource authz-resource.xsd"> <authz-resource id="guide-sample-foo-service" uri="service://sample/foo"> <display-name> <name locale="en">Hello World</name> </display-name> <resource-description> <description locale="en">Programming Guide Sample</description> </resource-description> <parent-group id="guide-sample-service" /> </authz-resource> </root>Warning
Set the character code to UTF-8 and save it.Note
You can specify arbitrary ID to the id attribute of authz-resource tag.Foor the uri attribute, you should specify the same value as the uri property of @Authz annotation specified by the @RequestMapping method.For the id attribute of parent-group tag, you should specify the same value with the id attribute of authz-resource-group which was previously created.You can specify the description of resource to the resource-description tag. This tag can be omitted.In the actual development phase, it is recommended to specify the Description to explicitly show to the authorization administrator which screen/process/data are represented by the registered resource.Place the created <authz-resource-group.xml> and <authz-resource.xml> files immediately under <STORAGE_PATH>/public/storage.Please log-in to intra-mart Accel Platform as Tenant Administrator.http://<HOST>:<PORT>/<CONTEXT_PATH>/loginClick [Site Map]→[Tenant Management]→[Job Management]→[Job Net Setting] in this sequence.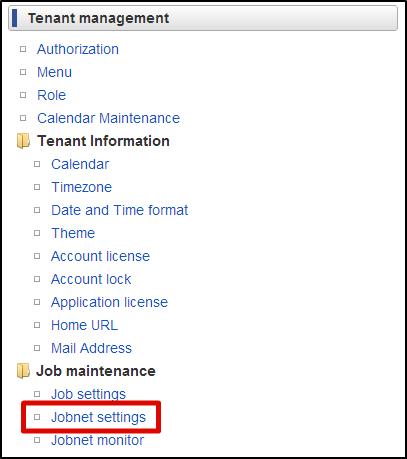 From the [Job Net List], select [Tenant Master]-[Import]-[Authorization(Resource Group) Import].Click the [Edit this job net] button on the lower part of this screen.From the [Trigger Setting] pull down, select [Specify Repetition] and click [New Registration] button.Keep [Execute only Once] selected, and click [OK] button.Check the [Enable] checkbox, and click [Update Job Net with this contents] button.Click [OK] button in the confirmation message.
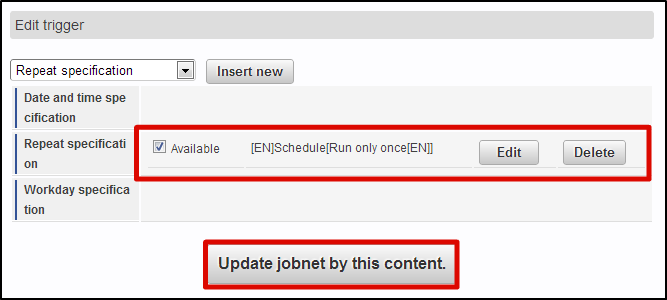 From the [Job Net List], select [Tenant Master]-[Import]-[Authorization(Resource) Import].Perform the same operation, and update job net.Click [Site Map]→[Tenant Management]→[Job Management]→[Job Net Monitor] in this sequence.Confirm that 2 lines [Authorization(Resource Group) Import] and [Authorization(Resource) Import] are displayed and are [Success].
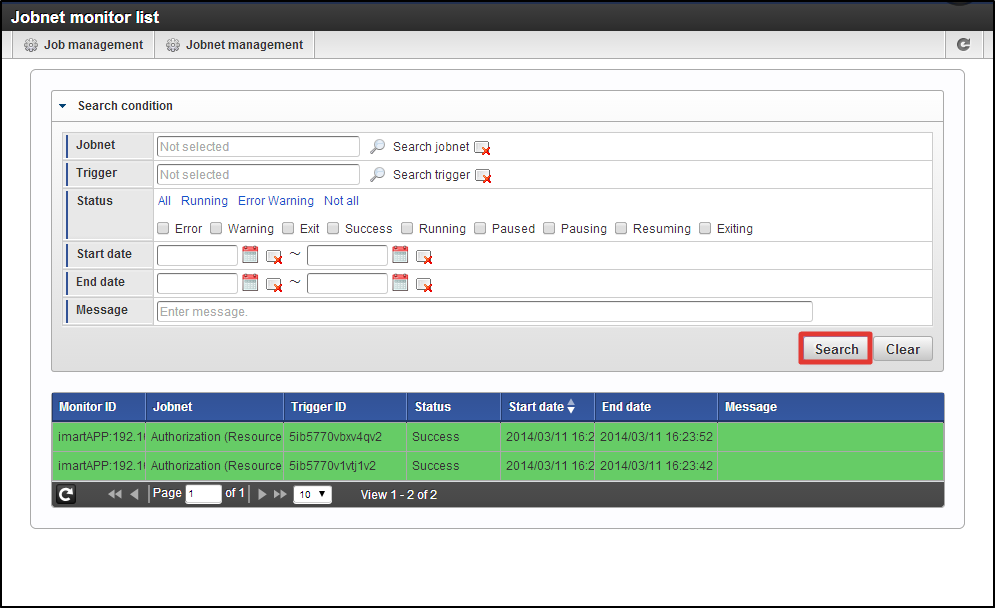 Now, resource group and resource which are necessary for the screen display have been registered to the authorization.Then, please proceed to the Step 3 operations.
Step 3:Set authority to resource.
Click [Site Map]→[Tenant Management]→[Authorization] in this sequence.Authorization Setting Screen opens. Click [Search] icon on the upper left of the screen.Enter “Hello” to the text box of [Resource (vertical axis) Filtering], and click [Search] button. You can confirm that [Programming Guide Sample] is displayed under [Screen/Process] of resource column, and can further see [Hello World] under it.This completes the registration of resource to this sample screen.Please try to access the URL below in this status.http://<HOST>:<PORT>/<CONTEXT_PATH>/sample/helloYou can see that it cannot be accessed by HTTP 403 error.Then, finally from this authorization setting screen, please proceed to the authorization setting to [Hello World].Click [SiteMap]→[Tenant Management]→[Authorization] in this sequence.Authorization Setting Screen opens. Click the [Search] icon on the upper left of the screen.Enter “Hello” to the text box of [Resource(vertical axis) Filtering], and click [Search] button.Click [Start Authority Setting] button.Click the intersection cell of [Hello World] row and [Tenant Management] column, and change it to the green checkmark.
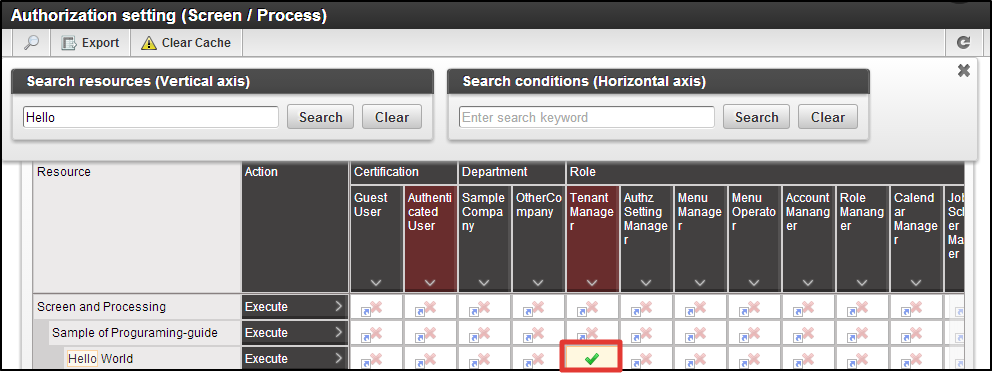 Access the URL below again in this state.http://<HOST>:<PORT>/<CONTEXT_PATH>/sample/tgfw/helloIt is confirmed that access was possible at this time.In this case only the user who has [Tenant Administrator] role can display this sample screen.
Note
In this tutorial, following points have been confirmed.