Base (Programming in intra-mart Accel Platform for the first time)
In this paragraph, we will go through the flow of the SAStruts framework development in intra-mart Accel Platformby creating Hello World using SAStruts framework development in intra-mart e Builder for Accel Platformas the introduction of the development at intra-mart Accel Platform.
Flow of tutorial
Prerequisites
intra-mart e Builder for Accel Platform should be installed.
intra-mart Accel Platform should be installed and default settings should be complete.
Create the environment including SAStruts development framework in the base module.Create the execution environment for unit testing.
Let us create Hello World in intra-mart e Builder for Accel Platform
Hello World is created by using the following procedure.
Step 1: Project Creation and Settings
Set the project by creating the module/project in intra-mart e Builder for Accel Platform.Refer to “Project Settings” and “Module/Project Creation” of “intra-mart e Builder for Accel Platform User Operations Guide”,for the techniques of project creation/setting.
Step 2:Modification of convention.dicon
Set route package in convention.dicon.In SAStruts framework specify the route package before the package name,save the required file by creating packages like action, and specify the URL.As an example, following is a package name and URL for creating Action class.for ex: In case of Action class name: Route package.action.foo.BarAction, URL ishttp:// Host name/war name/foo/bar/.Locate <% war_home %>/WEB-INF/classes/convention.dicon under src/main/resource,set route package, and mention it in convention.dicon as shown below.In the following example, route package is “sample.sastruts”.<?xml version="1.0" encoding="UTF-8"?> <!DOCTYPE components PUBLIC "-//SEASAR//DTD S2Container 2.4//EN" "http://www.seasar.org/dtd/components24.dtd"> <components> <component class="jp.co.intra_mart.framework.extension.seasar.convention.IMNamingConventionImpl"> <initMethod name="addRootPackageName"> <arg>"org.seasar.framework.container.warmdeploy"</arg> </initMethod> <initMethod name="addRootPackageName"> <arg>"tutorial"</arg> </initMethod> <initMethod name="addRootPackageName"> <arg>"sample.sastruts"</arg> </initMethod> </component> <component class="org.seasar.framework.convention.impl.PersistenceConventionImpl"/> </components>Note
Refer homepage of seasar2 for dicon file specifications,which carries out various settings such as convention.dicon, etc.
Step 3:Input Screen Creation
Create an input screen (index.jsp).Create a folder in /WEB-INF/view/sample/sa/hello under src/main/webapp of project.Create a file “index.jsp” under the created folder and implement the source as given below.<%@page pageEncoding="UTF-8"%> <%@ taglib prefix="imui" uri="http://www.intra-mart.co.jp/taglib/imui"%> <%@ taglib prefix="s" uri="http://sastruts.seasar.org" %> <%@ taglib prefix="f" uri="http://sastruts.seasar.org/functions" %> <!-- HEAD tag --> <imui:head> <title>Hello, World</title> <script type="text/javascript"> $(function() { $('#button').click(function() { $('#helloForm').submit(); }); }); </script> </imui:head> <!-- Title displayed on screen --> <div class="imui-title"> <h1>Hello, World (SAStruts)</h1> </div> <!-- Input screen --> <div class="imui-form-container-narrow"> <p> <label for="name">Please input the name. </label> </p> <!-- Settings of input form Enter the path to result display screen in action (Call output method of Hello action) --> <s:form action="/sample/hello/output/" styleId="helloForm"> <div> <!-- Textbox --> <imui:textbox type="text" value='' id="name" name="name" size="10" /> </div> <!-- submit button --> <imui:button name="button" value="Hello!!" class="mt-10" id="button"></imui:button> </s:form> </div>Warning
Save it with the character encoding as UTF-8.
Step 4:Output Screen Creation
Create an output screen (output.jsp).Create a file “output.jsp” under src/main/webapp/WEB-INF/view/sample/sa/hello of projectand implement the source as given below.<%@ page contentType="text/html; charset=UTF-8" pageEncoding="UTF-8" %> <%@ taglib prefix="imui" uri="http://www.intra-mart.co.jp/taglib/imui"%> <%@ taglib prefix="s" uri="http://sastruts.seasar.org" %> <%@ taglib prefix="f" uri="http://sastruts.seasar.org/functions" %> <!-- HEAD tag --> <imui:head> <title>Hello, World </title> <script type="text/javascript"> function back() { $('#back-form').submit(); }; </script> </imui:head> <!-- Title displayed on screen --> <div class="imui-title"> <h1>Hello, World (SAStruts)</h1> </div> <!-- Toolbar (Locate 'To previous screen' and 'Back' button) --> <div class="imui-toolbar-wrap"> <div class="imui-toolbar-inner"> <ul class="imui-list-toolbar"> <li> <!-- "Back" button icon and index method of HelloAction are called. --> <a href=${f:url("/sample/hello")} class="imui-toolbar-icon" title="back"> <span class="im-ui-icon-common-16-back"></span> </a> </li> </ul> </div> </div> <!-- Output result --> <div class="imui-form-container-narrow"> <label> <imui:textbox type="text" value="${f:h(helloDto.outputString)}" id="name" name="name" size="10" class="imui-text-readonly" readonly /> </label> </div>Note
In the tag mentioned in HTML file which is operated in the intra-mart Accel Platform,use <imui:head> for <HEAD> without mentioning the <HTML>, <BODY>.For details refer to UI (Design Guideline).Warning
Save it with the character encoding as UTF-8.
Step 5:Form Class Creation
Warning
Save it with the character encoding as UTF-8.
Step 6:Dto Class Creation
Create a Dto class which retains output information.Here, package name is sample.sastruts.dto.sample and class name is HelloWorldDto.Following is the source mentioned in HelloWorldDto.package sample.sastruts.dto.sample; /** * DTO class which is to be passed to result display screen * @author intra-mart */ public class HelloDto { public String outputString; // String which retains result }Warning
Save it with the character encoding as UTF-8.
Step 7:Action Class Creation
Create an Action class to take measures for input screen and output screen.Here, package name is sample.sastruts.action.sample and class name is HelloAction.Following is the source mentioned in HelloAction.package sample.sastruts.action.sample; import javax.annotation.Resource; import javax.servlet.http.HttpServletRequest; import org.seasar.struts.annotation.ActionForm; import org.seasar.struts.annotation.Execute; import sample.sastruts.dto.sample.HelloDto; import sample.sastruts.form.sample.HelloForm; /** * Action class which carries out processes of Hello World * @author oka */ public class HelloAction { @Resource @ActionForm public HelloForm helloForm; // Form class which retains input information @Resource public HelloDto helloDto; // DTO class which retains output information (Keep it public) /** * Return path of input page. * @return path of input page */ @Execute(validator = false) public String index() { return "/sample/sa/hello/index.jsp"; } /** * Return path of result display screen. * @return path of result display screen */ @Execute(validator = false) public String output() { helloDto.outputString = "Hello, " + helloForm.name; // store result information return "/sample/sa/hello/output.jsp"; } }Warning
Save it with the character encoding as UTF-8.Creation of Hello World is complete here.The source created so far is deployed properly in a folder on Resin server as per the project settings.While transiting to the production environment, apply the created project by user defined modularization or by deploying the source.
Registration and Screen Display
Step 1: Menu Registration
Here, practically execute the above created sample by registering it in the site map.Start Resin and login to the Accel Platform as the tenant administrator.URL of the login screen is “http://<HOST>:<PORT>/<CONTEXT_PATH>/login”.After that, maintenance screen of menu is displayed. Set the menu as follows.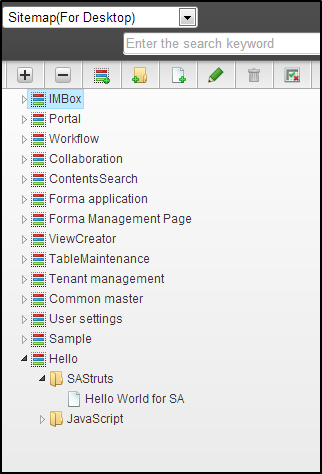 Enter the following information in the information of the new items created here.
Menu Item name (Japanese) Hello World for SA URL sample/hello Moreover, in order to browse the menu, set the authorization as follows in the created “Hello” group.In this paragraph, set such that the reference of the guest user and authorized user for Hello group can be approved.For details, refer to :doc: ../application/authz/index.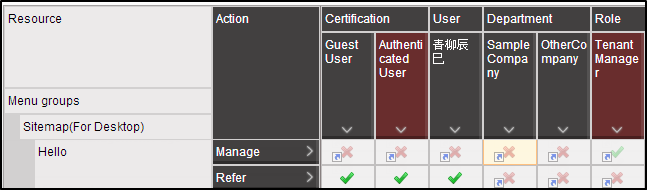
Step 2:Operation of Hello World
Reflect the set menu and execute it.It is possible to select from sitemap as shown in the following image.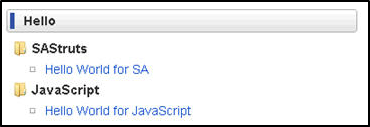 Input screen is displayed after clicking the menu item registered earlier on sitemap.
 When name is entered in the text box, it is displayed on the result screen.
 Returns to the input screen when the “Back” icon on the top of the result screen is clicked.
Note
The following points are confirmed in this tutorial.