Authorization
Items
For setting the access privileges of a screen
@Execute
public String index() {
    return "index.jsp";
}
The access to a screen is enabled by the action class settings.However, since the Authorization process will be omitted when execution is performed in this manner, anyone can view the screen.While actually operating the system, in most of the cases the access is restricted by setting access privileges and displaying the screen to specified users only.This chapter explains the procedures by which the screen provided is displayed to specified users only, using the Authorization functions provided by the Accel Platform.For the details of the execution method, refer to http://sastruts.seasar.org/featureReference.html#ExecuteMethod.
Meaning of Authorization
Overview of Authorization
Authorization is a function that controls the access to a resource requested by the user specified by the authentication function.| In the Accel Platform, a common mechanism of the Authorization function is provided which determines the “Who”, “What”, “How” by “Allow”, “Restrict”.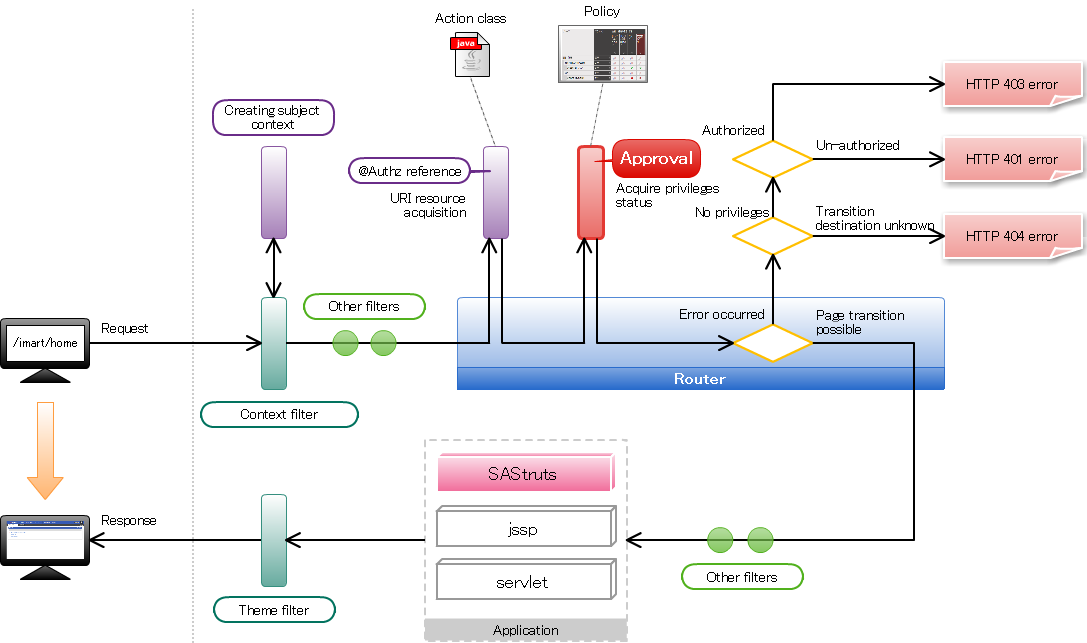
Subject
“Subject” in Authorization indicates the “Who” part.In the Accel Platform, the person to whom the privileges are to be given can be set by a combination of the “User”, ” Role”, “Company/Organization”, “Designation”, “Public Group”, “Public Group/Role”.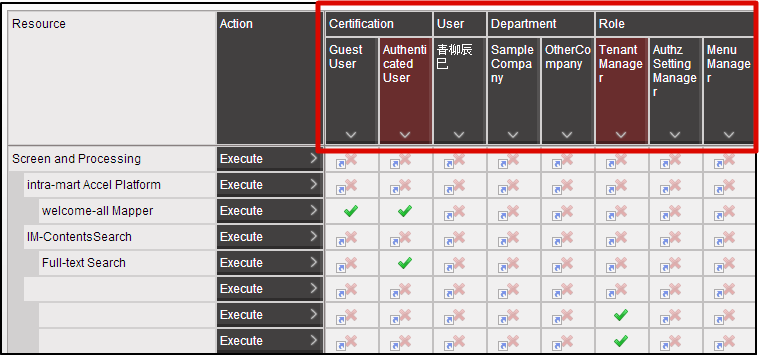
Resource and resource group
“Resource” in Authorization indicates the “What” part.For example, these are service systems of screens or web services etc. and data systems of menus or portals etc.Resource can have a parent and child hierarchy according to the “Resource Group”.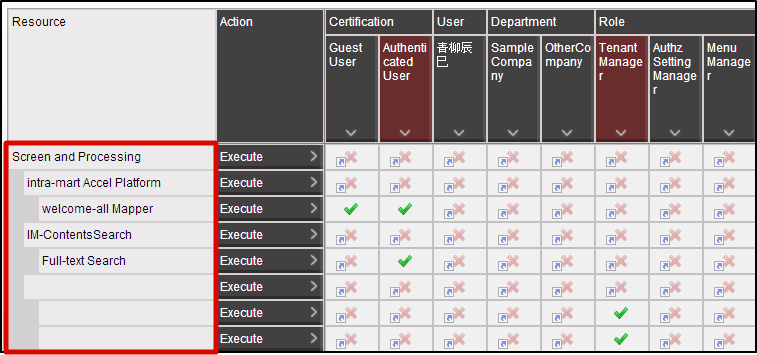
Resource Type and Action
“Action” in Authorization indicates the “How” part.Action contents are decided according to the type of resource.For example, a screen has only 1 action such as “Run”.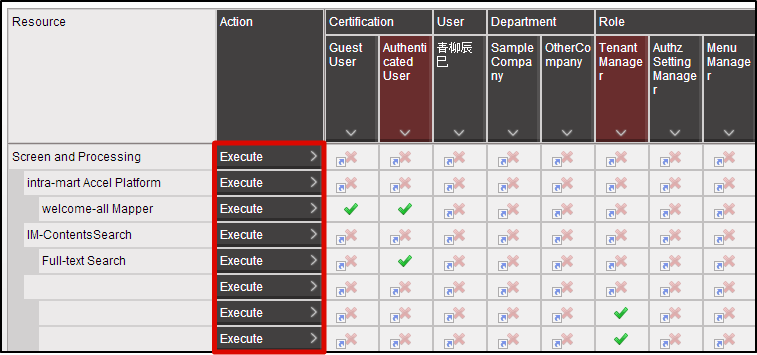
Policy
“Policy” in Authorization indicates the “Allow”, “Restrict” parts.Policy can be set for a combination of each subject/resource/action.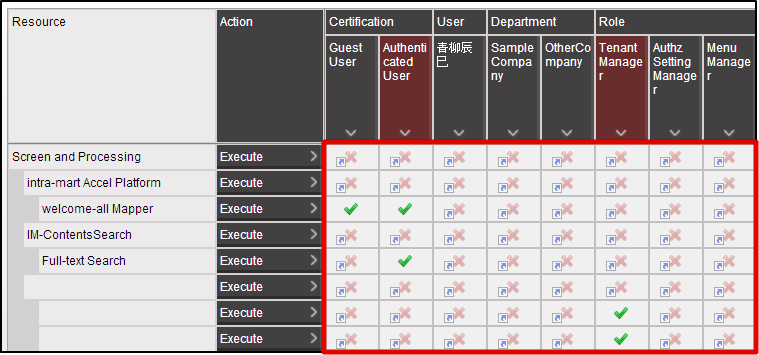 When policy is not set, the privileges of the resource group of the parent hierarchy are inherited.When the policy of the resource group of the topmost level is not set, it is treated as “Restricted”.
Authorization setting method to access the screen
Flow of privileges setting
In a router, enquiry of the privileges for authorization is done based on the information set in the execution method.During the enquiry, URI assigned to each resource as a key is used.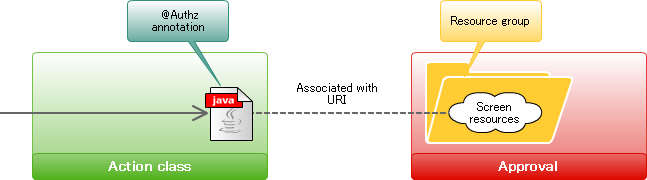 The operation procedure at the time of setting the privileges of a screen is as follows.
- Associate Authorization with the execution method
- Create the resources, resource groups of Authorization
- Import the resources
- Set privileges for the resources
Step 1:Associate Authorization with the execution method
In order to associate with the authorization, enter the @Authz annotation in the execution method.@Execute @Authz(uri = "service://sample/foo", action = "execute") public String index() { return "index.jsp"; }When it is a screen, specify the string starting with “service://” in the uri property.The “service” here is a string indicating the “resource-type” and it also represents “Screen/process”.For the resource type “service”, “execute” is provided as the only action.Therefore, “execute” has been specified in the action attribute.
Step 2: Create the resource groups, resources of Authorization
In order to associate the Authorization with the screen created in sample, register the resource groups and resources for Authorization.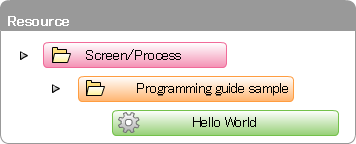 Register the resource group first.Create the blank <authz-resource-group.xml> file, enter the following and save.<?xml version="1.0" encoding="UTF-8"?> <root xmlns="http://www.intra-mart.jp/authz/imex/resource-group"> <authz-resource-group id="guide-sample-service"> <display-name> <name locale="ja">programming guide sample</name> </display-name> <parent-group id="http-services" /> </authz-resource-group> </root>
Warning
Save it with the character encoding as UTF-8.Note
An arbitrary ID can be specified in the id attribute of the authz-resource-group tagSpecify “http-services” in the id attribute of the parent-group tag.Next, create a blank <authz-resource.xml> file, enter the following and save.<?xml version="1.0" encoding="UTF-8"?> <root xmlns="http://www.intra-mart.jp/authz/imex/resource"> <authz-resource id="guide-sample-foo-service" uri="service://sample/foo"> <display-name> <name locale="ja">Hello World</name> </display-name> <parent-group id="guide-sample-service"/> </authz-resource> </root>Warning
Save it with the character encoding as UTF-8.Note
An arbitrary ID can be specified in the id attribute of the authz-resource tag.In the uri attribute, specify the same value as the uri property of the @Authz annotation specified in the execution method.In the id attribute of parent-group tag, specify the same value as the id attribute of the authz-resource-group created earlier.
Step 3:Import the resources
Locate the <authz-resource-group.xml> and <authz-resource.xml> files created earlier directly under the <STORAGE_PATH>/public/storage.Login to the Accel Platform as the tenant administrator.http://<HOST>:<PORT>/<CONTEXT_PATH>/loginClick “Site map” → “Tenant Management” → “Job Management” → “Jobnet settings”.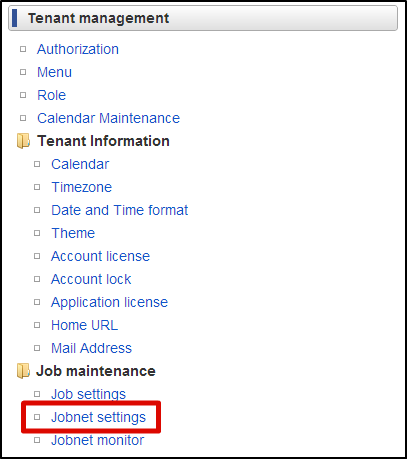 Select “Tenant master” -“Import” - “Authorization (Resource Groups) Import” from “Jobnet List”.Click “Edit this Jobnet” button at the bottom of the screen.Select “Specify repetitions” from the pull down of “Trigger Settings” and click the “New Registration” button.Click the “OK” button after selecting the “Execute only once”.Click “Edit the Jobnet with this content” button after checking “Valid” checkbox.Click the “OK” button on the confirmation message.
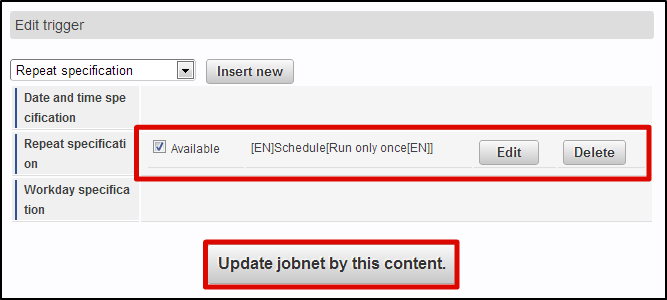 Select “Tenant master” - “Import” - “Approval (Resource) Import” from “Jobnet list”.Perform the same operation and update the Jobnet.Click “Site map” →”Tenant Management” →”Job Management” →”Jobnet Monitor”.2 rows of “Authorization (Resource Groups) import”, “Authorization (Resource) import” are displayed in the list and verify that they are set to “Successful”.
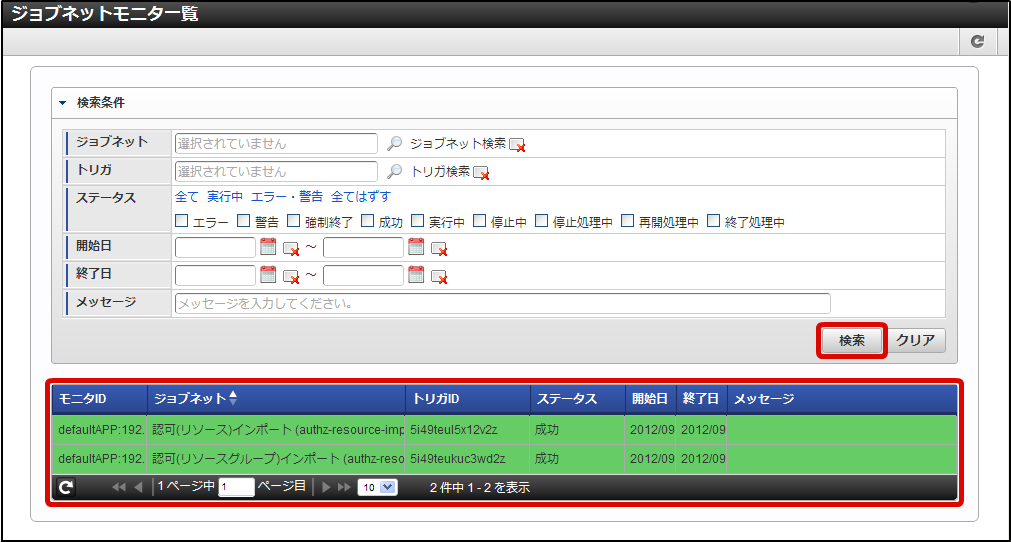 With this the resource is registered for authorization.Click in the order of “Site map” → “Tenant Management” → “Authorized”.After the authorization setting screen opens, click the “Search” icon at the top left of the screen.Enter “Hello” in the “Narrow down resources (Vertical axis)” textbox and click the “Search” button.
 It is possible to verify that under the “Screen/Process” of the resource column, “Programming Guide Sample” is displayed and further under that “Hello World” is displayed.With this the registration of the resources for this sample screen is complete.In this state, try to access http://<HOST>:<PORT>/<CONTEXT_PATH>/sample/hello.With HTTP 403, it is possible to confirm that access is denied.
Step 4: Set the privileges for the resources
Finally, carry out the Authorization settings for “Hello World” from this Authorization setting screen.Click in the order of “Site map” → “Tenant Management” → “Authorization”.After the Authorization setting screen opens, click the “Search” icon at the top left of the screen.Enter “Hello” in the “Narrow down resources (Vertical axis)” textbox and click the “Search” button.Click “Start Privilege Setting” button.Click the cell which is the intersection of the “Hello World” row and the “Tenant Administrator” column, and change it to a green check mark.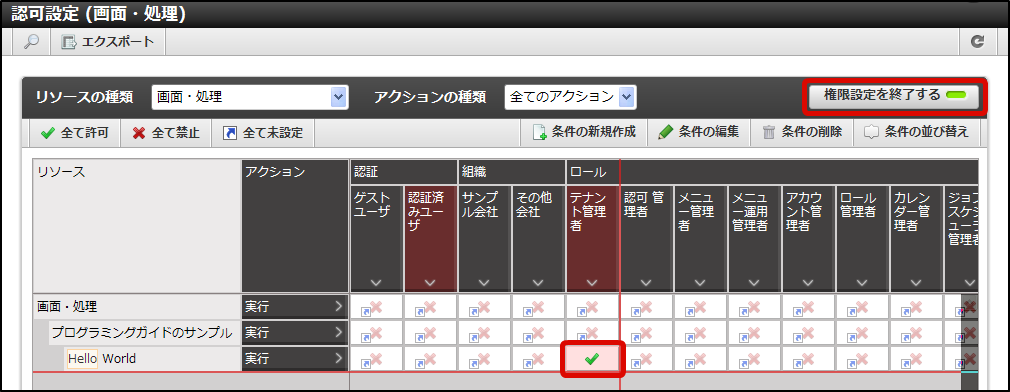 In this state, again try to access http://<HOST>:<PORT>/<CONTEXT_PATH>/sample/hello.It was possible to confirm that this time it could be accessed.In this case, only the users who have the “Tenant Administrator” role can view this sample screen.
Note
Following points were confirmed in this tutorial.