Set table
The method to create a table to manage the data entered in IM-FormaDesigneris described below.
Contents
Table setting
The table to save the data entered in Web application created in IM-FormaDesignerand the application screen for IM-Workflowis created automatically based on the screen items set in “Main form”.
Function and description of each part of table creation screen
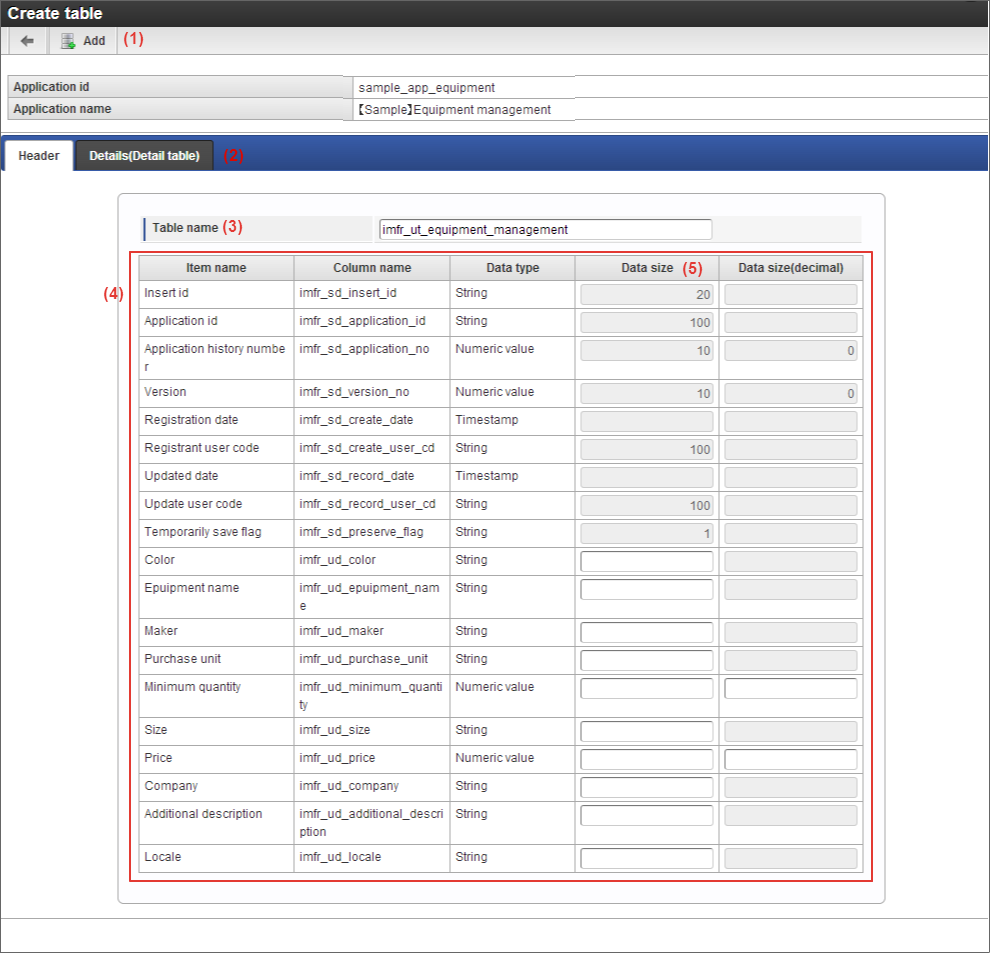
The contents of table creation screen are as follows.
Add
Create a table to manage the application data.
Header / Details
Depending on the screen item set in the main form, set header table / details in table unit from the tab.Create table one by one in Detail table unit.Table name
Set physical name of table to be set in header table and Detail table within 30 characters.The maximum number of characters of physical name of the table can be changed by configuration file of IM-FormaDesigner.Table definition information
Column name / data type are set automatically based on the setting of the fields for IM-FormaDesignermanagement and input fields of main form.Data size
Set the required number of digits when the data type of input items set in main form matches with either “Character type” or “Numerical type”.
Create / update table to manage input data
Step 1 : Display table setting screen
- Click “Table setting” tab of application basic information screen.
- Table setting screen is displayed.
Steps 2-1 : Set column (field) of table
Execute only the 2-1 procedure if “Detail table” of screen items is not used in the main form.
When new application is created and table setting is not performed
Confirm that “There is no table setting information.” is displayed and click “Add”.
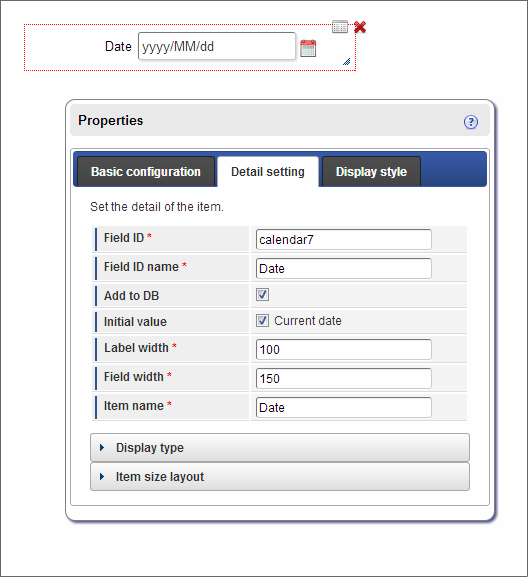
The table information wherein the field of screen item for which “Add to DB” check of property field set in main form is ON and the items for internal management of IM-FormaDesignerare set as column of table, is displayed.
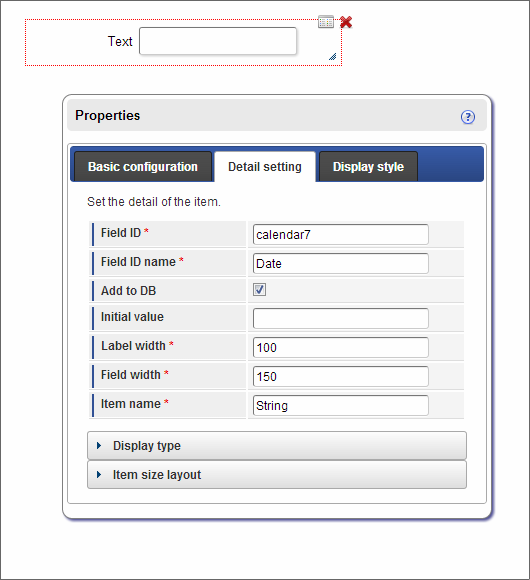
Enter data size of column having “Data type” as “String”, “Number” in the screen item column for which the “Add to DB” check of property field is “ON” in the main form.
- Enter “Data size”for string.
- Enter 2 fields, “Data size” and “Data size (decimal)” for the numerical value.
Confirm that no setting is omitted in the setting contents of table and click “Add” on the top of the screen.
Click “OK” on the registration confirmation message.
Header table is created.
Warning
Set the value of data size similar to “Maximum letters” , “(Number of digits) of maximum input value” of the screen item corresponding to column (field) of table or a greater value.The unit of data size can be “Byte” according to the type of database used in intra-mart Accel Platform. Enter the number of bytes by referring the number of characters to be entered and character code of database.
When table setting is performed after application creation (Update)
Table setting should be performed if screen items set in main form are added / deleted after the previous table setting.
- Confirm that information of created table is displayed in “Table setting” and click “Update”.
- If it is required to add the column corresponding to the screen item added in the table, enter “Data size” and “Data size (decimal)” as per the requirement as it is automatically added and displayed.
- Confirm that no setting is omitted in the setting contents of table and click “Update” on the top of screen.
- Click “OK” on the update confirmation message.
- Table is updated.
Step 2 : Set column (field) of table
When “Detail table” of screen item is used in main form, execute 2-2 procedure after 2-1 procedure.When “Detail table” of screen item is used within the main form, it is required to create 1 Detail table in the database for 1 Detail table.
- Regarding Header table, set “Data size”, “Data size (decimal)” according to Create / update the table to manage input data.
- In case of the main form in which Detail table is set, click “Detail table” tab as “Header table” “Detail table” is displayed by tab.
- The table information wherein the field for which “Add to DB” check of column property field of “Column” set in Detail table is ON and the fields for internal management of IM-FormaDesignerare set as column (field) of table, is displayed.
- Enter data size of the column having “Data type” as “String” “Number” for the column for which “Add to DB” check for column property field is “ON”.
- Modify the name of header table and Detail table such that it is within 30 characters and click “Add” on the top of the screen.
- Click “OK” on the registration confirmation message.
- “Header table”, “Detail table” are created.
Delete the table to manage input data
Step 1 : Display table setting screen
- Click “Table setting” tab of application basic information screen.
- Table setting screen is displayed.
Step 2 : Delete table information
- Click “Delete” on the bar at the top.
- The confirmation message “Are you sure you want to delete the table information?” is displayed. If header table / Detail table on the database are also to be deleted, set the check of “Delete the table which stores application data.” to ON and click “OK”. If the table on the database is not to be deleted, click “OK” without setting the check to “ON”.
- Table is deleted.
Recreate table to manage input data
When it is required to recreate the table
Step 1 : Display table setting screen
- Click “Table setting” tab of application basic information screen.
- Since table setting screen is displayed, click “Refer”.
- Check the setting contents of table.
Step 2 : Save table data
- When table is recreated, the data registered till that time is deleted, hence when table is to be transited after recreation, create copy of another table by database management tool and save the data.
Step 3 : Delete table information
- Click “Delete” on the bar at the top.
- The confirmation message “Are you sure you want to delete the table information?” is displayed. To delete the header table / Detail table on the database, set the “Delete the table which stores application data.” check to ON and click “OK”.
Step 4 : Create table
- Change form item.
- Confirm that “Table setting information does not exist” is displayed and click “Add”.
- Enter the data size of column having “Data type” as “String” “Number” in the column of screen item for which “Add to DB” check for property field is “ON” in the main form.
- Confirm that the field of table corresponding to screen item for which data type is changed in screen item on main form, is changed.
- Confirm that setting is not omitted in setting contents of table.
- When “Add” on the top of screen is clicked, Header table, (Detail table if Detail table exists) is created.
- Use the database management tool when the data of the table before deletion is to be inserted into new table.


